
Batch files Explorer
Click the Batch files tab from the Isatis.neo Main Interface to access to the Batch files explorer. From this explorer, you can create, edit, record, run, copy, rename or delete batch files.
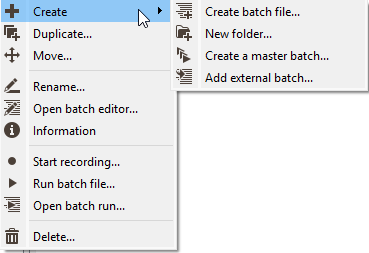
Right click a batch file to display the contextual menu:
- Click
 Create /
  Create batch file to create a new batch file. This batch file is created directly in the batch folder of the project. By default, it is named Recorded YYYY-MM-DD at hh.mm.ss. Otherwise simply enter a New name.
 - Click Create /
 New folder to create a new folder. This folder can be created directly at a first level or in an already existing folder. In this case, define the Parent Directory and a New name. Otherwise simply enter a New name.
 - Click Create /
 Create a master batch to create a new batch file (named “_master” by default) which includes all the selected ones. This action requires the selection of one batch file at least. Batch files appear in the same order as they have been selected.
 -
Click Create /
 Add external batch to attach a batch file located outside the folder of the project. Once added, this batch file will appear in the batch file list (in the explorer and in the top right part of the ribbon). It could be then edited / run from the project.
 - Click
 Duplicate to save a copy of the selected batch file and all its content. Define a New name for this batch file.
 - Click
 Move to relocate the selected batch file. Define its new destination. A batch file can be moved inside a dedicated project folder (located in the batch folder) or outside of the project. Batch files can also be moved by a drag-an-drop in the batch tree of the explorer.
 - Click
 Rename and enter the New name for the selected batch file.
 -
Click
 Open batch editor to edit the content of the selected batch file through the Batch Editor.
- Click
 Information to display information (name, path, dates of creation and last modification, application and summary) in the Messages window (and in a popup window).
 -
Click
 Start recording to launch the recording into the selected batch file. By default, the
  Query mode is activated. In this way, Isatis.neo should ask confirmation before storing the individual actions and their corresponding parameters in the batch file. Switch to the
  Automatic mode to automatically store the tasks and their associated parameters at the end of each run. Click
  Stop to end the recording.
Note: When recording in Query mode, the message asking confirmation to store the action in the batch file is popped up at the end of the run (i.e. if the run is successful). You can also press the Save button to store the task without running it. It can be useful if computation times are heavy.
-
Click
 Run batch file to run all the actions stored in the selected batch file. You can run one batch file at a time only.
-
Click
 Open batch run to open the batch runner. Opening this runner allows you to see the different tasks recorded into the batch file. You are able to run each of them separately or a selected sequence, on the contrary to the Run batch file action which launches the entire content of the batch file.
- Click
 Delete to definitely remove the selected batch file(s). If the selected batch file is an external file, you can either detach it only or delete it from disk.
 -
Click
 Collapse all /
  Expand all to respectively hide / show the content of all directories in one click.
Note: Be careful that moving or renaming a batch file can break the include links as they refer the file name (and the path for the external files).