
Migration from Isatis Classic
This section lists all the Isatis studies available in Isatis Classic. It is initialized from the projects list you can found in%APPDATA%/Geovariances/Isatis under Windows or %HOME%/.isatis under Linux. This list can also contain Isatis backups. You can remove or add some studies from the list:
-
 Click Add an Isatis Classic study to the list to load an existing Isatis Classic study which is not present in the list. This functionality allows to specify the physical path of the study in your file system. This study can then be converted in Isatis.neo by clicking on
  .
. -
 Click Add an Isatis Classic backup to the list to load an existing Isatis Classic backup which is not present in the list. This functionality allows to specify the physical path of the backup in your file system. This backup can then be restored and converted in Isatis.neo by clicking on .
 -
Click Convert to an Isatis.neo project to recover your Isatis Classic studies in Isatis.neo. The plugin only works with Isatis Classic 2016+ studies (Isatis 2016, 2017 or 2018). The following data objects are converted within the same tree hierarchy (directories and files):
- Points 2D/3D will be converted into Points 2D/3D.
- Lines 2D/3D will be converted into Points 2D / Lines 3D. The Linked header file will be used as Tops in Isatis.neo.
- Grids 2D/3D will be converted into Grids 2D/3D.
- Polygons 2D/3D will be converted into Polygons 2D/3D. ZMin and ZMax are per-contour in Isatis, a warning will appear if they are different in some contours of the same polygon.
- Wireframes 3D will be converted into Meshes 3D. We will lose variables from the wireframes. We will convert all objects from Isatis wireframes to different meshes in Isatis.neo (i.e. if a file contains 3 wireframes with 2 objects each, we will end up with 6 meshes in Isatis.neo).
- Faults 2D/3D: Faults are attached to the Isatis input points file. Conversion will create a file named <Input File>_Faults. 2D faults will be converted to Polylines (with a Z=0) and 3D faults to meshes. We will lose priorities and auxiliary variables that are associated to each segment in Isatis.
For each converted data table, variables are converted keeping the same type (selection, float, integer…). Comments attached to any directory, file, variable are kept.
Other Isatis Database objects are converted:
- Color Scales: We only convert User-Defined (Regular, Irregular, Log Bounds (converted to irregular in Isatis.neo) and Categorical Color Scales. In Isatis.neo, there is no Color Sampling mode or Legend options.
- Neighborhood: Unique or Image neighborhoods are not converted.
- Experimental Variogram: The calculation (number of pairs, average distance, variability) is integrated on the Geostatistical Set but not the experimental variogram parameters (lags, number of lags…).
- Variogram Model: They are integrated in the Geostatistical Set. In Isatis, angles are stored with their convention, so we convert them to Mathematical rotation. As it does not exist in Isatis.neo, Cauchy Models, Advanced Options (Convolution, Incrementation, Truncation) or Drift will not be converted (in this case an error message will be reported). An Isatis Variogram Model refers to an Experimental Variogram. If both exist, they will be converted to a unique Geostatistical Set with the name of the Isatis model.
Some Isatis objects will not be converted because they do not exist in Isatis.neo: the anamorphosis functions (because they are different in Isatis and in Isatis.neo), Correlation Models, PCA/MAF Model, Proportions and Multi-linear Regression Models.
Clicking on the Migrate project from Isatis action will open the following window:
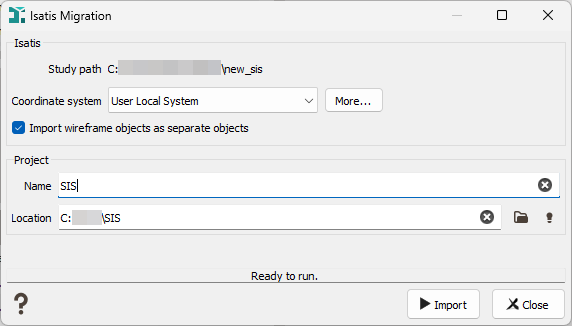
- Study Path: Path of the current Isatis study you want to migrate in Isatis.neo.
- Coordinate System: Select a specific projection in the list or click More to open the Coordinate System Selector window. If needed you can select User Local System which means the coordinates won’t be projected. In Isatis, projects are not associated to a coordinate system. It is the role of the user to ensure that all data are defined in the same coordinate system. In Isatis.neo, you have to define a coordinate system associated to the project. In this way if the imported data are not defined in the same coordinate system as the one of the project, they will be automatically reprojected by the application.
- Name: Enter the name of the project. A physical path will be attached to your project for that purpose (see below).
- Use Default Location: Use this option if you want to save the project in the default location (generally C:/Isatisneo/Projects). If you want to specify your own location, do not select this option and click on the folder icon to select your own location.
A complete report of all encountered objects that were converted or not is generated in the Application Messages window at the end of the migration.
-
 Select one or several Isatis Classic studies and click Delete Isatis Classic studies to remove them from the list. A popup window asks you to choose between Detach only and Delete from disk. The firstDetach action consists in unloading existing studies from the list. The study will remain on your disk (the physical study is not deleted) but its name will no longer appear in the list of available studies. Then you can use the button Add an Isatis Classic study to the list to see again the study in the list. If you want to delete the study and its contents, use the Delete from disk action. Once the study is deleted, there is no "undo" capabilities.
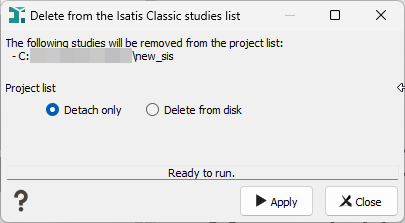
For space saving, this section can be hidden by clicking on ![]() .
.