
Configure License Permissions
If License Services is running in "Enterprise" mode, you can restrict the distribution of licenses to particular users or groups of users in your organization. A Department License Server key is required to enable this feature.
Licensing permissions is an enterprise feature.
Enterprise features are disabled by default, meaning all users connecting to the server can check out or lock any available license. This isn't always desirable, say, when you need to reserve a minimum number of licenses for a particular department, job role or site.
Note: Licensing permissions are granted to users and groups in the context of Windows Active Directory. This facility must be available to continue with granting permissions.
Important: When enterprise features are enabled for the first time on a server, the default status of ALL licenses is set to "no permissions'. This means that licenses are not available to anyone by default. As such, you may need to plan downtime if you need to adjust a lot of licenses and grant "allow" permissions for staff before they return to work.
To enable licensing permissions on your server:
-
Launch License Manager as an Administrator.
-
Tools >> Options.
-
Select the Network License Server tab.
-
A prompt displays indicating license access for all users will be removed until permissions are granted.
Click Yes.
-
Configure individual license and solution permissions (otherwise all licenses remain unavailable to anyone).
To grant license permissions to users and groups:
- With License Manager running, in the left-hand pane of the License Manager, right-click one of the following:
- A license server.
- A solution.
- An individual license.
- Multiple licenses (use the <CTRL> or <SHIFT> keys to select multiple licenses that will receive identical permissions.
-
In the context menu, select Permissions.
The Permissions screen displays.
-
Groups or users with permissions for the associated license(s) are displayed in the User or group names list, for example:
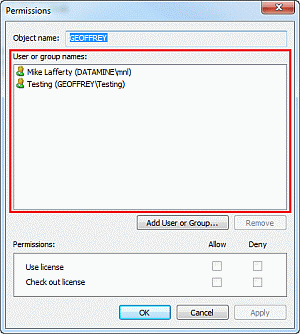
Note: If you previously selected multiple licenses or solutions, the current permissions for the first license only display. Any changes you make from this point onwards apply to ALL licenses selected beforehand.
-
Click Add User or Group to display Microsoft's standard screen for searching for users, computers, service accounts or groups.
Note: The contents of these screens and behaviour of functions are not under Datamine's control.
Select users or groups and click OK to transfer them to the parent screen.
-
Select an item in the User or group names table and then set a permission:
-
Use license – Either Allow or Deny a user or group to lock (lease) one of the selected licenses.
-
Check out license – Allow or Deny a user or group to check out one of the selected licenses.
-
-
Click OK to apply the license permissions to the selected item(s).
Related topics and activities