
Face Map Features
Note: For general information on map feature digitizing and configuration, see Map Features.
As string data, map features can be modified using any of Studio's core toolkit of editing commands. Some commonly-used commands are featured on the Draw (Features) ribbon, but any string editing command is potentially available (use the Find dialog to discover more commands, or expand the reference section of this Help file to find out more).
Features can be edited in either World, map and even butterfly views, with all edits instantly reflected in all views of the same data.
Note: All feature digitizing commands will honour the current snapping and Auto Node switches, and are supported by undo and redo commands.
There are many options when it comes to viewing data in Studio Mapper. In projects containing multiple maps and a mixture of georeferenced and non-georeferenced maps, even more options become available.
The following guidelines may help you manage your field mapping projects.
- Capture map features in a map
view before georeferencing
You can modify map data in either a Map or 3D World view, but it is often easier to digitize features, comments, sketches etc. whilst the map view is displayed. The Map view will contain only data relevant to the current map, making it easier to focus on a particular face. - Clean your survey data before importing it for level mapping
This not only ensures a more accurate view of reference data, it also ensures that, if the Drape Mapping to Survey option is enabled, the projected shape of the digitized feature or other data closely matches the surveyed backs elevation profile. -
Use filled textures in your display templates
If you have a display template associated with a particular features object in your system configuration file, the legend can include textures. Closed/polygon structures on maps can then display a pattern overlay that can help differentiate structures, e.g.: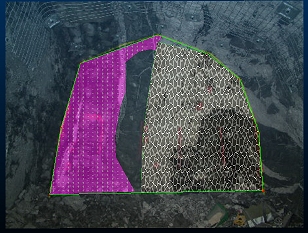
- Use clipping for multi-face maps
(drives and partial drives)
Where multiple faces exist for map, it is possible for a non-active face to partly obscure the one you're working on. Studio Mapper deals with this using smart transparency settings, but it can also be useful to clip data either side of the active plane. As the active plane is commonly aligned with the active face, clipping lets you view a face in isolation.
Clipping options are available on the 3D | View ribbon and the Navigation toolbar. - Make use of the "Pick Map"
function
The Pick Map command is available on the Map ribbon. It can be useful in a busy 3D World view as it lets you interactively pick a map to make it current and set the active section. It also automatically centers and pans the view to focus on the picked map. It's a quick way of swapping current maps in the 3D World view. - Use double-click or double-tap
to complete digitizing
You don't have to click or tap Doneto complete digitizing. Instead, you can just double-click or double-tap to end the digitizing action. This is particularly useful when sketching or digitizing map data on a tablet device. - Close a string to complete digitizing
You can complete a digitizing operation (or sketching) by closing the string, that is, positioning the final vertex at the same position as the start (commonly done using snapping). -
Wireframe map digitizing always snaps to the surface
There's no need to set up snapping modes when digitizing data (say, a polygon feature) onto a wireframe map. The closest wireframe vertex will always be the point at which a line vertex is positioned.
-
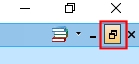
Consider using multiple cascaded windows
Where multiple georeferenced maps exist in the 3D World view, you can display it and associated Map views at the same time.If windows are currently maximized, click the Maximize toggle in the top right of the application:
You can arrange data windows so they are concurrently displayed, e.g.:
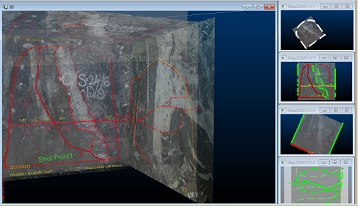
If the 3D world window is displayed, clicking into any of the available Map window thumbnails will automatically update the 3D view to show the map corresponding to the active window. This means you can make any georeferenced map current and displayed in the 3D World window just by clicking its Map window "preview". Selecting a non-georeferenced map window will not update the 3D World window.
-
If you're using a portable device at the face, enable the on-screen keyboard. If this mode is active, if you click into an editable field, an easy-to-see on screen keyboard pops up to let you tap your values directly into the system. Tap away from the keyboard to dismiss it automatically.
Feature Strike Direction
Mining geologists often measure the azimuth and dip of structures exposed in underground excavations using a specialised compass. It is possible to edit an existing feature strike direction by making use of a system _AZIMUTH field, and to edit the corresponding dip direction using a system _AZIPL90 field.
You (or your system implementer) can expose these fields to the Features panel of the Mapping Task Bar via the system configuration file. This allows you to change the overall strike direction and dip direction of the string quickly and easily, either at the face or back at the office.
For example, you could extend a feature object's configuration using the following attribute definition syntax:
<Attribute>
 <ColumnLabel>STRIKE</ColumnLabel>
 <FieldName>_AZIMUTH</FieldName>
 <EntryProperties>
   <Type>NUMERIC</Type>
   <Minimum inclusive="TRUE">0</Minimum>
   <Maximum inclusive="TRUE">360</Maximum>
 </EntryProperties>
</Attribute>
<Attribute>
 <ColumnLabel>DIPDIRECTION</ColumnLabel>
 <FieldName>_AZIPL90</FieldName>
 <EntryProperties>
   <Type>NUMERIC</Type>
   <Minimum inclusive="TRUE">0</Minimum>
   <Maximum inclusive="TRUE">360</Maximum>
 </EntryProperties>
</Attribute>
The clever bit is the _AZIMUTH and _AZIPL90 field definition. These are reserved system fields that allow you to view and set the overall azimuth/strike and dip direction of the target feature string. Once set, the feature rotates until the target values are reached.
Note: Point features cannot be edited using these system fields.
Related topics and activities