
Configure Domain Task from Grade Shells
To access this screen:
-
Dynamic Modelling ribbon >> Add Task >> Grade Shells.
The Configure Domain Task from Grade Shells screen is used to define the grade bins to be represented as distinct models in the output combined solids data from the Dynamic Modelling workflow.
This workflow item uses the Create Grade Shells task to create output solids.
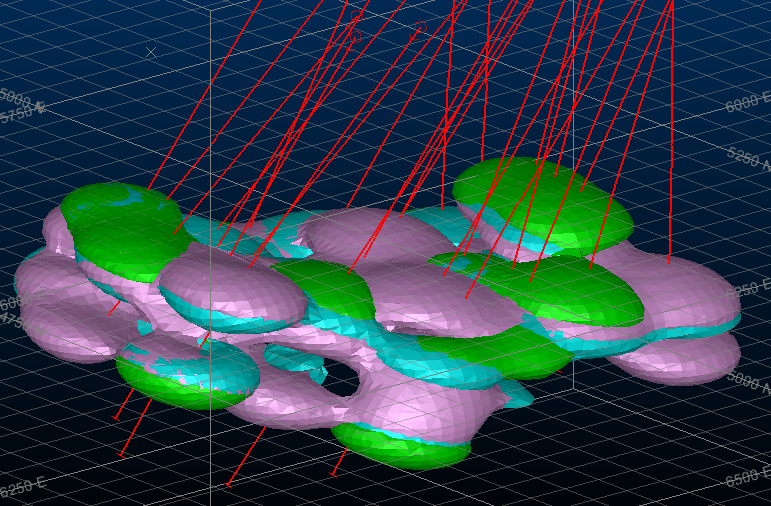
An example of 3 grade bins modelled via the Dynamic Modelling workflow
Whilst typically, grade shells are modelled independently of categorical values but you aren't constrained by this. For example, if you want to model a dyke to remove a zone from the grade shell output, you could.
Note: Drillhole data must be loaded and selected to generate grade shells in Dynamic Modelling. See Update Drilling Data.
Define your product (grade) attribute and choose how grade intervals are calculated (either using a linear or logarithmic distribution for more skewed deposits). Grade bins are calculated automatically to start with, and you can then adjust them either by changing the lower bounds of each interval, or by manually adding and removing your own bins.
A useful box plot shows the current bin distribution throughout the overall grade range for the selected product and this updates as grade bins are modified below, for example:
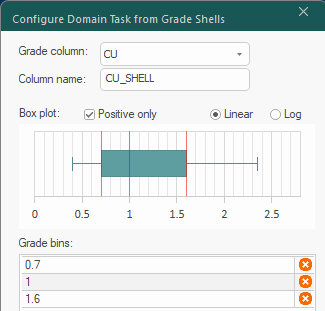
In the example above, 3 grade bins have been calculated (0 to 0.7, 0.7+ to 1, 1 to 1.6) as a linear distribution of grades.
Note: Bins are automatically calculated at Q25, Q50 and Q75 positions.
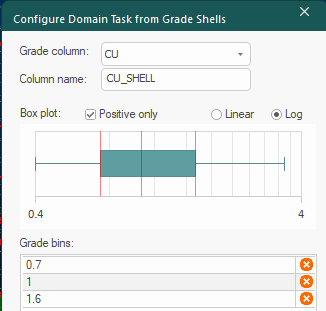
With the same data, but with a logarithmic distribution, the box plot updates accordingly, for example:
You can add new grade bins either by:
-
Entering a lower bound to the editable field below the bins table and clicking +.
-
Clicking into the box plot at the lower bounds of the bin.
Grade shells automatically cut on higher value grade shells during modelling.
Note: When modelling grade shells, the Constrain Ends setting used by the modelling command is set to Both by default, meaning shell surfaces are snapped to the collar and EOH positions. This can be changed via the Create Grade Shells task using the cog  icon).
Tip: You can also fine-tune existing bin lower values by editing the table directly.
Locking Domain Task Items
When you've achieved the result you want, it would be a real shame to accidentally overwrite it when all tasks are re-run later. Thankfully, Studio Geo lets you lock tasks so that, no matter what other changes are made in the Dynamic Modelling workflow, important and final model structures are preserved.
To lock a domain task item (it will need to have been run at least once), click its green tick  and it becomes a padlock
  , indicating that this domain value model won't change the next time the workflow is run. The associated play
  and settings are also removed to prevent accidental editing of important modelling parameters.
Note: You can also disable a domain item (categorical or grade shells). Click the existing icon until  appears to skip that item on subsequent modelling runs.
Editing Grade Shell Domain Task Items
Grade shell volumes are integrated with the Dynamic Modelling framework in the same way as other structures; they are modelled and combined with other structures in the order set by you (representing chronology).
Each item represents a "grade bin" as defined using the Configure Domain Task from Grade Shells screen.
You may want to adjust the way trend ellipsoids are calculated in a more refined way. For example, the trend for modelling grade bins of larger grade values (say, AU=3), will be smaller; and trends for smaller grade values (say, AU=0.5), may be larger than the default trend. These can be adjusted using grade shells UI through the settings, and can also be adjusted more interactively using the edit-ellipsoid and new-ellipsoid commands.
Clicking the purple settings button next to the domain task item reveals the user interface for the corresponding tool. You can then make whatever changes you need to ensure your output model is as you need it.
Each domain task item is modelled independently, although they are (optionally) combined into a single combined solids object afterwards to emulate the chronological order in which the structures were created or deposited.
During processing, each domain task displays an icon indicating its current status.
See Process the Workflow.
Tip: Once modelled data has been generated, you can format each of the separated domain wireframes independently, meaning more flexibility when presenting your data. See Dynamic Modelling Outputs.
Domain Task Item Data Visibility
A domain task can include several items, with each linked to a particular implicit modelling tool and associated parameters. You can show or hide the data for a particular domain task item using the corresponding check box within the domain task.
-
Unchecking a domain task item hides any displayed associated 3D data. The data that is hidden depends on the tool associated with the item:
-
Faults domain task – Faults wireframe, boundary string, boundary prototype and fault traces. See
-
Contact surfaces domain task – Contact surface wireframe, additional points string, boundary string, boundary prototype and faults wireframe.
-
Vein domain task – Vein surface or volume, additional points strings, boundary prototype, faults wireframe, trend surface wireframe, boundary string output, contact point output. See
-
Categorical domain task – Categorical volume(s), custom ellipsoid, ellipsoids grid, additional points string.
-
Grade shells task – Grade shells volume(s), custom ellipsoid.
-
-
Selecting settings
of a domain task causes all associated data for that task to be displayed if hidden.
Note: You can also toggle the display of output combined solids and domain-specific separated wireframes. See Dynamic Modelling Outputs.
Add a New Grade Shell Domain Task
To add a new grade-shell-domain task to the modelling workflow:
-
Load drillholes with at least one grade attribute for the product you plan to model. See Update Drilling Data.
-
Display the Configure Domain Task for Grade Shells screen.
-
Select a Grade column. This is the attribute that represents your product and contains numeric grade values.
-
Specify a Column name or accept the default name (
[ATTRIBUTE]_SHELL). -
Choose how to display the Box plot below:
-
To show a chart with a normally-distributed range of values, select Linear.
-
To show a chart with logarithmically-distributed values, select Log.
Note: This doesn't change the value of the automatically-calculated grade bins, only how the interval boundaries are displayed throughout the grade range available.
-
-
Edit the Grade bins:
-
Change the lower value of the grade bin by editing it directly in the table.
-
Delete a grade bin with X.
-
Add a new grade bin either by clicking into the box plot or adding a value in the editable field below and clicking +.
Note: Grade bins are always listed in ascending value order from top to bottom. Add a new value automatically adjusts the order to maintain this.
-
-
As it is, all grade shells will be generated using the default colour legend for the first numeric column in the drillhole data, which may not be that useful for representing grade shell interval lower limits. To change this:
-
Go to the Drillholes task.
-
Display the Dynamic Modelling Properties control bar.
-
Select the attribute being modelled, for example, AU.
The Dynamic Modelling Properties bar updates to show details for the drillhole attribute.
- Next to Add managed column, click +.
-
In the Column section, make sure your grade attribute is selected for Drillhole column.
-
Click Create Default Legend.
This creates a legend for your grade attribute but the intervals of this legend may not necessarily match the grade bins you have created.
-
Click Edit Legend and modify the intervals of the display legend using the Legends Manager. For example, if you have a bin that spans grade ranges 0 (zero) to 0.5, an interval should exist in the legend for the same values.
-
Apply and Close the Legends Manager.
-
-
By default, a single data-wide ellipsoid is used to govern the directional trend of shells throughout the drillhole data. This is calculated based on the mean grade value of all samples, with the resulting ellipsoid used for all modelled volumes.
Uncheck Use default trend to perform a more local search to establish ellipsoids that encourage a more granular trend throughout the data.
Note: Choosing more localized trending will increase processing time.
-
Adjust the grade value used to generate ellipsoids (default=1) to any value to encourage results more akin to higher or lower grade scenarios.
Tip: Review the trend with the edit-ellipsoid command to visually align the ellipsoid to better represent sample continuity.
Tip: Using the same trend for all surfaces makes the surfaces similar, which can improve the appearance of grade shells embedded in a combined solid.
-
Click OK to generate a new domain task in the modelling workflow, with each domain item listed with its lower bin value and automatically-generated name (and check box to control visibility), for example:

-
Check or uncheck the domain item to toggle visibility (either before or after the data exists and is displayed).
-
The status of the current task. In the above image, the grade shell has been created, but there is at least one warning.
-
The colour of the shell and the lowest value of the grade bin.
-
The display name for the grade shell.
-
Access the Create Grade Shells tool to set up bin-specific modelling settings.
-
Create or recreate the grade shell.
-
Delete the domain item.
-
Reorder the sequence in which grade shells are generated.
-
-
Click Play All to generate all grade shell domain items.
-
Review the results and adjust settings and either recreate individual shells or all of them. For example, the following
Tip: Consider formatting each item of your combined solids model independently. Consider making low or waste zones transparent to reveal the good stuff within. See View Separate Solids and Fault Blocks
-
Save your project.
Change Domain Item Settings
Once created, any item in a domain task can be modelled using dedicated tool options. Depending on how the task was originally modelled, or the type of data being created, you can display the associated implicit modelling task and make changes.
To change implicit modelling settings of a domain task item:
-
Display the Dynamic Modelling Framework framework.
-
Locate the domain task containing the item(s) you want to configure.
-
Within the domain task, locate the domain task item (an independent modelling activity). This will appear as the modelled attribute value name within a colour chip, the description of the item and a collection of buttons, for example:

-
Click the purple cog button to reveal the implicit modelling task associated with the item. This will be one of the following:
-
Create Vein Surface – A vein modelling tool. See Create Vein Surface
-
Create Contact Surfaces – A tool for modelling inter-value contact surfaces. See Create Contact Surface.
-
Create Categorical Surfaces – A tool for modelling distinct drillhole values that doesn't assume a linear continuity. See Create Categorical Surfaces.
-
Create Grade Shells – A grade cutoff modelling tool. See Create Grade Shells
-
-
Adjust implicit modelling settings for the domain task item.
Note: These settings are saved for future dynamic modelling runs unless subsequently altered.
-
Close the implicit modelling task window.
-
Re-run the domain task item using the green arrow
 and review the output data.
 -
If you're happy with the result, save your project. Otherwise, adjust the settings until you are.
Deactivate a Domain Task Item
-
Display the Dynamic Modelling Framework framework.
-
Locate the domain task containing the item(s) you want to deactivate.
-
Uncheck the item you don't wish to perform on the next run.
-
Save your project.
Change the Order of Domain Task Items
Within a domain task, implicit modelling activities are performed in a top-down order. You can reposition domain task items within the domain task:
-
Display the Dynamic Modelling Framework framework.
-
Locate and select the domain task you wish to perform either sooner or later within the task list.
-
Use the up or down arrow to position the modelling task either higher up the list (completed sooner) or down the list (to be performed later).
-
Re-run All and assess your results.
-
If you're happy, save your project.
Add a Domain Task Item
You may want to add a previously modelled surface or volume to the domain task (or you may just want to reinstate one that was previously deleted).
Note: You can only add data to a domain task that was previously modelled using the Dynamic Modelling framework. This is because data generated by this tool includes references to mechanisms used to create it.
To add a domain task item to an existing domain task list:
-
Ensure the wireframe data to be added (surface or volume) is loaded.
-
Display the Dynamic Modelling Framework framework.
Note: Steps 1) and 2) can be completed in either order.
-
Expand the domain task to be modified so that all modelling values display.
-
Expand either the Add contact surface, Add cross-cutting list and select the dynamically modelled wireframe data object.
Note: The Add cross-cutting list includes options to also Create new vein, Create new categorical and Create new grade shells. These display the corresponding implicit modelling task to configure the model output.
The new item appears at the top of the list.
-
Use the up and down arrows to move the modelling activity either earlier (higher) or later (lower) in the task list.
-
Re-run all tasks and check your outputs.
-
Save your project.
Delete a Domain Task or Task Item
You may want to remove a domain task from the workflow, or remove one of its modelling activities.
To remove a domain task, including all associated domain task items:
-
Display the Dynamic Modelling Framework framework.
-
Using the toolbar at the top, click Configure Tasks.
The Dynamic Modelling - Configure Tasks screen displays.
-
Locate the domain task to delete and click "X" to remove it from the list.
-
Click OK and confirm that you wish to delete the task.
Warning: This is a permanent deletion and can't be undone.
-
Save your project.
To remove a domain task item from an existing domain task:
-
Display the Dynamic Modelling Framework framework.
-
Locate the domain task and the task item to delete and click "X" to remove it from the domain task.
-
Save your project.
Related topics and activities