
Draw and Edit Map Data
Studio Mapper provides a range of digitizing commands and tools to help you capture field data quickly and efficiently, spending minimal time at the face.
As such, Studio Mapper operates in different modes, depending on the type of device in use: A desktop configuration, supported by a mouse and keyboard, is one scenario. The other is a portable device used in the field to gather the latest visible evidence for reinforcing existing geological and operation models. This mode is supported by gesture controls and assumes a stylus as the primary input device. These modes are referred to as "Mouse version Touch". See Mouse and Touch Mode and Gesture and Stylus Controls.
Digitizing with a touch device is often where you need to emulate sketching, but also being able to digitize polygonal and contact structures that have a shared 'edge'. Snapping options and drawing modes such as auto-node-switch ("ans"), auto-snap-switch ("asn") and snap-always-switch ("sna") can be a great help here, as can sketching with a dedicated command and screen.
Maps are viewable using the 3D window, or for face maps, a dedicated map window that can also be expanded to show all available faces in the same orientation as a butterfly map.
Occasionally, you'll need to enter data, even when capturing data at the face (say, to register a particular rock type against a polygon, for example) and here, the on-screen keyboard provides a desktop-like environment without having to go back to the office.
Regardless of the operating environment, The Mapping Task Bar is where you'll find yourself most often. This is where you add your map data such as geological feature outlines, sketches, channel sample data, comments and more.
All of these tasks require some form of 3D visualization. Control how data displays using the Navigation Toolbar.
Advanced String Digitising in Face Maps
All Studio Products offer Advanced String Design controls to constrain the length, gradient and azimuth of subsequent string edges. Whilst this is also available to Studio Mapper users, it requires a change of project setting using a command line instruction (show-project-settings) but there are things to bear in mind when digitizing face maps in this mode. In most cases, the constraints available in advanced mode apply more to mine design and planning than more geological domains, but the tools are there should you wish to use them.
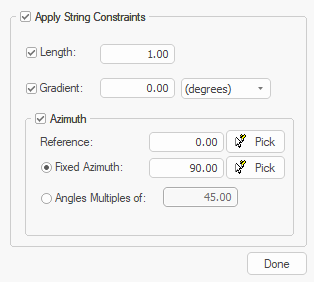
Advanced digitising controls display during active new-string and extend-string commands
Face maps, if a full heading is being captured, represent the sidewalls, faces and backs of maps as a cuboid. In a map view, this data is viewed orthogonally, but in a 3D view (after georeferencing) the cuboid can be oriented in any way. In a non-georeferenced map, remember the following logic, as the face you are editing influences the behaviour of advanced/constrained digitising:
-
Digitizing onto the face or sidewalls (if they exist for your map) means you are digitising onto a vertical section. This means any Azimuth constraints are irrelevant as there are no azimuth changes during digitizing.
-
Digitizing on the back (top) or floor (unlikely as it is) will honour azimuth constraints but, as a horizontal plane, no gradient changes will be applied, so this setting isn't used.