Map Display Templates

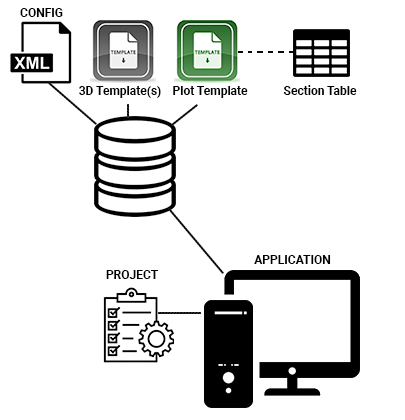
Your system configuration file lets you associate a 3D display template with a map feature or channel sample. This is normally configured by a Studio Mapper system implementer.
Using this approach, you can format any digitized map feature independently, which is a great way to standardize map reports throughout your organization. You can also format your channel samples by associating a display template with them in your configuration file.
All template files referenced by your system configuration file must be located in a "Templates" folder at the same location as your system configuration (.mpcfg) file.
Studio Mapper uses the following templates to provide consistent visual feedback:
-
3D display templates: These determine how your 3D map data objects appear by default in a map window. These templates have a ".3dtpl" extension and can be created or modified using the 3D Properties dialog associated with each data type. 3D display templates can be referenced in your configuration file independently for all map data types (features, channel samples etc.).
Note: 3D display templates are surrounded by
<Template>...</Template>tags in your XML system configuration file. -
Plot view templates: these templates are used to control the visual appearance of data within plot projections. Plot projections are used in PDF reports.
Formatting for reports can be set independently of other settings. This means that your map data can appear different in a map view and in the final PDF report. Like 3D display templates (see above), plot view templates can be referenced by your configuration file independently for each map data type. You can create and modify plot view templates using the Format Display dialog for the associated data type. Plot view template files have a ".tpl" extension.
Note: The name of the associated plot view template is specified within
<PlotTemplate>...</PlotTemplate>tags. -
Plot sheet templates: these templates are defined for, and used by, each supported map type within your configuration file. This template will have the extension ".dmtpl" and will determine the layout of your plot report components, including projections, plot items and dynamic tables. Plot sheet templates can be created by saving a plot sheet as a template.
Note: Plot sheet templates are defined using the <MapType><ReportTemplate>...</MapType></ReportTemplate> tags in your configuration file.

Templates control the appearance of data (by default) in 3D and Map data windows and output plot reports accordingly.
3D display and plot view templates can be specified independently for map objects, allowing your 3D window formatting to differ from your output PDF reports if you wish. For example, you may wish to include more labelling in an output PDF report than you would normally see in a 3D or Map view.
-
Example 3D display templates are installed with your application. See Example Files and Templates.
-
An example report template is also installed with your application. This can be found with a standard installation here:
C:\Database\DMTutorials\Projects\MapperDBTut\Templates
-
You can also refer to plot templates in your configuration file independently for features, channel samples, channel sample areas, profiles, areas, comments and sketches.
Features Templates
An external 3D template file can contain store one or more templates, and each template contains formatting information that can be applied to a 3D object (although some parameters may be data type-specific). These templates can be used to control the appearance of map features in your projects.
For example, if your configuration file describes a feature object called "Geology", you can select [Geology] when setting up a map, using the Map PropertiesFeatures panel, e.g.:

The XML definition that supports this choice can include, amongst
other things, a <Template>...</Template> parameter. For example:
<Features>
<ObjectType>
<Name>Geology</Name>
<Template>GeologyTemplate</Template>
<PlotTemplate>GeologyPlotTemplate</PlotTemplate>
...
In the above example "GeologyTemplate" is the name of a 3D display template held in an external file called "Strings.3dtpl". This file is created using the 3D Properties dialog's Template Export facility and must be stored in your current database, in a folder at the root level, called Templates. This is the same folder you use to store Studio Mapper report templates. The "GeologyPlotTemplate" item refers to a named .tpl file.
Feature Formatting Example
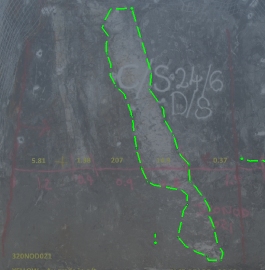
In the following example, the aim is to create a 3D display template that will be applied to all contact and outline features for a "Geology" Map feature. The formatting will be such that the outline of each feature will be a green dashed line, 4 pixels in width, like this:

Here's one way to add new formatting to an existing 3D template:
Note: This activity assumes previous knowledge of system configuration file preparation, and how 3D display templates work.
- Ensure your configuration file contains a specification for the feature you are going to add to a map, and automatically format using a display template. See System Configuration File.
- Load or create a Studio Mapper project.
- In Studio Mapper, digitize a string in the primary 3D window.
-
Edit the 3D properties of the string until it is formatted as you like. Use Apply to update the 3D view as you go.
Tip: One quick way to access the String Properties panel is to double-click it to reveal the String Properties panel.
- Select the Templates tab and click Import...
- Navigate to your currently active database's Templates folder and see if a file with a ".3dtpl" extension is there. If it is, load it. If it isn't, close the import dialog proceed to the next step.
- Click New to add a new template definition to your 3D mapping template. Give it a name (you'll need this later).
- Click Update Template to transfer the current 3D settings to the template.
- Click Yes to confirm.
-
Click Export and browse to your currently active database's Templates folder to save your file. You can use any name and the file extension will be added automatically, e.g. "Strings.3dtpl".
Warning: Be careful not to overwrite an existing file as it may be used by other Studio Mapper functions.
- In your system configuration file, ensure the XML snippet for the Geology feature contains the syntax in a format similar to that shown in the introduction.
- Close, save and reopen your project.
- Geology features will now be digitized and displayed using the latest 3D template formatting.
You can assign templates independently for each feature in a configuration file. Providing the specified template exists in the associated .3dtpl file, it will be applied when a feature of that type is digitized.
Profile Templates
Profile strings can be formatted using a 3D data display template.
The XML definition used to associate a template with profiles is like this:
<Profiles>
<Template>ProfilesTemplate</Template>
<PlotTemplate>ProfilesPlotTemplate</PlotTemplate>
...
In the above example "ProfilesTemplate" is the name of a 3D display template containing string formatting details, held in an external .3dtpl file.
The "ProfilesPlotTemplate" item relates to a named .dmtpl file, stored in the "Templates" folder above which your .tpl configuration file is located.
Channel Samples Templates
Channel sample data can be formatted using a 3D data display template. This template can be stored in the same file as your features template(s), if required.
All channel samples generated within the current database will share the same template, keeping things consistent.
The XML definition used to associate a template with channel samples is like this:
<ChannelSamples>
<Name>Name</Name>
<Template>ChannelTemplate</Template>
<PlotTemplate>ChannelPlotTemplate</PlotTemplate>
...
In the above example "ChannelTemplate" is the name of a 3D display template containing string formatting details, held in an external .3dtpl file.
The "ChannelPlotTemplate" item relates to a named .dmtpl file, stored in the "Templates" folder above which your .tpl configuration file is located.
Channel Sample Areas Templates
Channel sample area data can be formatted using a 3D data display template.
The XML definition used to associate a template with channel sample areas is like this:
<Areas>
<Template>ChannelAreaTemplate</Template>
<PlotTemplate>AreaPlotTemplate</PlotTemplate>
...
In the above example "ChannelAreaTemplate" is the name of a 3D display template containing drillhole formatting details, held in an external .3dtpl file.
The "AreaPlotTemplate" item relates to a named .dmtpl file, stored in the "Templates" folder above which your .tpl configuration file is located.
Comments Templates
Visual formatting of comments on output reports can be controlled using a plot template (.dmtpl)
The XML definition used to associate a template with comments is like this:
<Comments>
<Template>CommentsTemplate</Template>
<PlotTemplate>CommentsPlotTemplate</PlotTemplate>
...
The "CommentsPlotTemplate" item relates to a named .dmtpl file, stored in the "Templates" folder above which your .tpl configuration file is located.
Sketches Templates
Visual formatting of sketches on output reports can be controlled using a plot template (.dmtpl)
The XML definition used to associate a template with comments is like this:
<Sketches>
<Template>SketchesTemplate</Template>
<PlotTemplate>SketchesPlotTemplate</PlotTemplate>
...
The "SketchesPlotTemplate" item relates to a named .dmtpl file, stored in the "Templates" folder above which your .tpl configuration file is located.
Vertical Sections Templates
Visual formatting of vertical sections on output reports can be controlled using a plot template (.dmtpl)
The XML definition used to associate a template with comments is like this:
<StratSections>
<Template>StratSectionsTemplate</Template>
<PlotTemplate>StratSectionsPlotTemplate</PlotTemplate>
...
The "StratSectionsTemplate" item relates to a named .dmtpl file, stored in the "Templates" folder above which your .tpl configuration file is located.
Related Topics and Activities

