
Configure Central Database

Note: this information relates to Studio Mapper's data synchronization facility. Studio Mapper can also connect to a MineTrust server for data management across your organization. Contact your local Datamine office for more information.
To access this screen:
-
In the Database Settings dialog, select the Central Database tab..
A Studio Mapper project can be associated with either a local and central database:
- A local database represents your working area for your project. It is the one you will take to the face and update with the latest field data. A local database is always required to use Studio Mapper. A local database is always required to work with Studio Mapper projects.
- A central database is, typically, a shared database that is receives
prepared map data from multiple users. A central database is optional. If one is configured for your system, you can quickly synchronize your local and central database before you go to
the face using Central
Database synchronization options.
Typically, if a central database is available, you update your local data with that on the server before you go to the face, and then update or append your local (but connected) working database whilst in the field. You then return to the office then upload the latest field discoveries to the central database.
The Central Database panel is used to define a connection to a remote folder. Typically found in a multi-user environment, this will allow you to do the following:
- Commit latest field data to a shared, central database for others to access, say, after a face visit and final data preparation.
- Retrieve latest data from a shared, central database such as reference data, the latest configuration files and templates, before you head off to the mine
- Replace some or all of your local database with the equivalent content on the central server. This may include editing, adding or deleting local files. Use this option with caution!
You can control the data you send or receive; this can be done by data type ro date range. More details are below.
Also see The Studio Mapper Database.
To assign another existing local database to your project:
You can also swap to any existing local database to access map contents within:
- Activate the Setup ribbon.
-
Select Setup >> Database.
The Settings screen displays, with the Local Database tab shown.
- Browse for or manually enter a fully-qualified path to an existing database folder.
- Active the Mine and Area tab.
- Select the Current Mine containing the data to be accessed.
- Select the Current Area containing the data to be accessed.
-
Click OK.
The current database connected is stopped and new database contents are loaded. The loaded structure will be revealed in the Project Data control bar for the currently active mine and area.
Note: If you are working with a central-local database arrangement, it is expected that a centrally-stored configuration file is made available locally using the synchronization options on the Central Database panel, although this doesn't have to be the case and you can specify an independent configuration file for your local projects if you wish, using the Local Database panel.
Warning: Whilst self-contained projects (that is, projects that incorporate their own local database) can be relocated to a different folder location, care should be taken if other projects link to it as the remote projects will no longer be able to access it.
To swap between different mines or areas of the current database:
- Activate the Setup ribbon.
-
Select Setup >> Database.
The Settings screen displays, with the Local Database tab shown.
- Active the Mine and Area tab.
- Choose a new Current Mine.
- Choose a new Current Area.
- Click OK.
To update a LOCAL database with latest CENTRAL database contents:
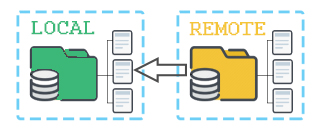
Warning: With this procedure, newer files on the central database will potentially overwrite older ones on the local database
- Activate the Setup ribbon.
-
Select Setup >> Database.
The Settings screen displays, with the Local Database tab shown.
-
Check that your Local Database Directory contains data to be updated. If not, browse for the relevant database folder.
-
Expand the Central Database menu.
-
Select the Central Database screen.
-
Ensure your Central Database Directory describes a network path to the central data store you are expecting. If the folder isn't available (say, the remote folder doesn't exist, or network issues are preventing it from being accessed), the path is shown in red, meaning you will be unable to update your local database. You'll need to resolve these issues before you continue.
- Choose what you want to update locally (if newer files exist).
- To update your local configuration file with the one on the server, select Configuration files.
-
To update your mapping data with the latest available on the server, select Mine Files and;
- Expand the Mine drop down list to choose specific mine data to update, or select <All mines> to consider all mines when updating local data.
- If a specific Mine is chosen, choose a specific Area to update, or select <All areas> to consider all areas when updating local data.
-
If data updates are time-sensitive, you can choose to only update your local database with files on the central database modified from a specific (inclusive) date onwards.
For example, if you're only interested in central database changes made since November 1st 2020, check Only files modified since and pick 01/11/2020 from the date picker. Files on the central database that were modified before this date will be ignored.If Only files modified since is unchecked, all data files of the selected scope will be reviewed when applying updates.
- Consider making a copy of your local database at this point. You can do this by duplicating the target data folder on disk.
-
Click Update Local Database. Files on the central database that are newer than local files that pass the constraints specified (if any) will be copied to your local system, overwriting those already there.
Note: New files may be added to your system but existing files that are on your system (but not on the central database) will not be removed, even if they don't exist on the server.
- Click OK to return to your local project, running with the latest data.
To update a CENTRAL database with new LOCAL database contents
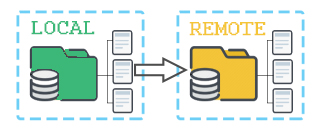
Warning: With this procedure, newer files on the local database will potentially overwrite older ones on the central database, and be accessible to other team members.
- Activate the Setup ribbon.
-
Select Setup >> Database.
The Settings screen displays, with the Local Database tab shown.
-
Check that your Local Database Directory contains data to be updated. If not, browse for the relevant database folder.
-
Expand the Central Database menu.
-
Select the Central Database screen.
-
Ensure your Central Database Directory describes a network path to the central data store you are expecting. If the folder isn't available (say, the remote folder doesn't exist, or network issues are preventing it from being accessed), the path is shown in red, meaning you will be unable to update your local database. You'll need to resolve these issues before you continue.
- Choose what you want to update remotely (if newer files exist).
- To update your remote configuration file with the one on the local machine, select Configuration files.
-
To update your remote mapping data with newer data on your local machine, select Mine Files and;
- Expand the Mine drop down list to choose specific mine data on the server to update, or select <All mines> to consider all mines when updating server data.
- If a specific Mine is chosen, choose a specific Area on the server to update, or select <All areas> to consider all areas when updating server data.
-
If data updates are time-sensitive, you can choose to only update your central database with files on the local database modified from a specific (inclusive) date onwards.
For example, if you're only interested in local file changes made since November 2st 2020, check Only files modified since and pick 02/11/2020 from the date picker. Files on the local database that were modified before this date will be ignored.If Only files modified since is unchecked, all local data files of the selected scope will be reviewed when applying updates.
-
Click Update Central Database. Files on the central database that are older than local files that pass the constraints specified (if any) will be updated to match your local content.
Note: Files on the server that aren't found on your local system (for the specified scope) are not removed with this function.
- Click OK to return to your local project. Other database members can now access your latest changes.
To completely replace LOCAL database contents with CENTRAL database contents
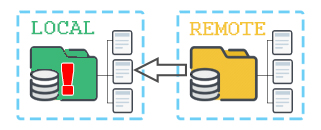
Warning: This option will REPLACE the contents of
your local database that pass the specified filters, including
deleting existing local files if they can't be found on the
CENTRAL database. You can't undo this action. Consider making
a backup of your local database before you use this option
if you are unsure of the contents of the CENTRAL database.
Replacing a database will involve:
- Initial DELETION of your local database contents (all
files in the Mines sub-folder)
- Replacement of files according to the filters provided.
For example, if you are replacing your local database
and the Only files modified since date is set to 28th
March 2021, the LOCAL database will be replaced with all
CENTRAL files modified on or after 28th March - all other
LOCAL files will be deleted.
Use this option with caution!
- Activate the Setup ribbon.
-
Select Setup >> Database.
The Settings screen displays, with the Local Database tab shown.
-
Check that your Local Database Directory contains data to be replaced. If not, browse for the relevant database folder.
-
Expand the Central Database menu.
-
Select the Central Database screen.
-
Ensure your Central Database Directory describes a network path to the central data store you are expecting. If the folder isn't available (say, the remote folder doesn't exist, or network issues are preventing it from being accessed), the path is shown in red, meaning you will be unable to update your local database. You'll need to resolve these issues before you continue.
- Choose what you want to replace locally (regardless of local file modification dates).
- To replace your local configuration file with the one on the server, select Configuration files.
-
To replace your mapping data with the latest available on the server, select Mine Files and;
- Expand the Mine drop down list to choose specific mine data to replace, or select <All mines> to consider all mines when updating local data.
- If a specific Mine is chosen, choose a specific Area to replace, or select <All areas> to consider all areas when updating local data.
-
If data updates are time-sensitive, you can choose to only replaceyour local database with files on the central database modified from a specific (inclusive) date onwards. For example, if you're only interested in central database changes made since November 1st 2020, check Only files modified since and pick 01/11/2020 from the date picker. Files on the central database that were modified before this date will be ignored.
If Only files modified since is unchecked, all data files of the selected scope will be reviewed when applying updates.
- Consider making a copy of your local database at this point. You can do this by duplicating the target data folder on disk.
-
Click Replace Local Database. Files on the central database, regardless of their modification date will replace equivalents found in the local database.
Warning: This can potentially overwrite newer, local file changes with central database contents.
Local files that do not exist on the server will be removed with this activity. - Click OK to return to your local project.
Related Topics and Activities