
Autolayout: Create Multiple Lines
To use this autolayout action:
-
Edit Automated Design Rules screen >> Action >> Create Multiple Lines.
This autolayout action provides various ways to repeat the generation of line data along input strings.
Note: There is also a Create Line autolayout rule that is useful for creating a single string automatically.
For example, you may want to insert a vent raise every 50 meters along a drive, or indicate a cubby position at regular intervals and so on.
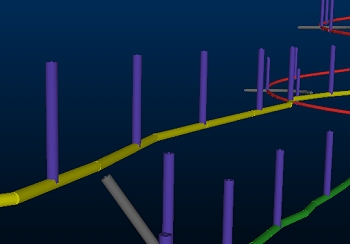
The Create Multiple Lines
tool, like other automated design rules, will be applied to a nominated
subset of your input design strings. The actual data used as a baseline
for multiple line creation will be determined by the Input Filter
in the Edit Automated Design Layout
Rules panel (Input Filter) and these will be generated based
on a predefined design
definition.
Create Autolayout Rule
To add a "Create Multiple Lines" automated layout rule:
-
Display the Edit Automated Design Rules screen, define a rule with an Action of Create Multiple Lines.
-
Click inside the settings cell and browse to display the Create Multiple Lines screen.
-
Enter the Length of all generated strings.
-
Enter the Azimuth of the new string section. This can be set as a real-world azimuth or in relation to the existing design data (relative).
-
Define a string Gradient n either degrees, % or a ratio.
-
Choose a Start Position. This can either the Start or the End of qualifying design data.
-
Define a positive or negative Distance from Start Position to offset the start of the curve from the start or end of design data.
-
If you want the first string to be positioned at the either the specified interval from the start, or the calculated interval if a number of repetitions is specified, check Create at First Location. If unchecked, the first string is positioned at the string start point.
-
You can either repeat strings at fixed intervals, or by repeating a set number of times. Select a Repetition Method:
-
Select Fixed Intervals and pick the distance between strings. The distance between all generated strings is the same in this case.
-
Select Count to generate a fixed number of strings by the rule.
-
Set the number of times to repeat string generation.
-
-
Select Variables Intervals to define custom distances between successive strings, using the
-
The Create Line Settings screen displays the following options:
-
Repeat at Intervals – Can be chosen instead of Repeat # Times. This value sets the distance between successive strings if no other instruction causes a different interval to be used, for example, if the Always Create At End option is used, the final interval may be shorter than specified.
-
Repeat # Times – Can be chosen instead of Repeat at Intervals. Choose a number of repetitions along the base string to generate new string data. This can either be Evenly Distributed along the base string(s) or as a set number of repetitions at a given interval.
For example, if you want to create 3 drive strings at right angles to a decline, each 40m apart from the start of the string, you could select the Repeat # Times option, set the Distance from Start Position to zero and enable the At Intervals option, using '10' as the associated interval value.
-
Always Create At End: select this option to always add a string at the end point of the base string(s), potentially violating other interval constraints. Disabled by default.
Related topics and activities