
Add a Dependency Layer
Activity steps:
- Home ribbon >> Editing >> Project Settings.
- Display the Dependency Layers screen.
- Create a new layer in the last blank row by entering a name in the Layer column.
- Specify the table options:
- If Schedule is checked, all dependencies assigned to the layer are used in the calculation of the schedule. If unchecked, the assigned dependencies are ignored.
- If View is checked, all dependencies assigned to this layer are visible in the Gantt chart, otherwise they are hidden.
- Use Style to set the the Format of the dependency line. Click into the field to display the Style Picker.
Default Type is the dependency type for all dependencies on this layer. You can reapply these settings to all dependencies on this layer on the Replace Dependencies screen.
Default Lag represents the default dependency lag (delay) for all dependencies on this layer. You can reapply these settings to all dependencies on this layer on the Replace Dependencies screen.
Dependencies on layer displays the total of dependencies of the layer. You can't edit these values.
Use Group to categorise layers displayed on the screen. Enter a value and press <ENTER> to either:
Add the target dependency layer to an existing group shown below uncategorised items or;
Create a new dependency layer group and add the layer to it.
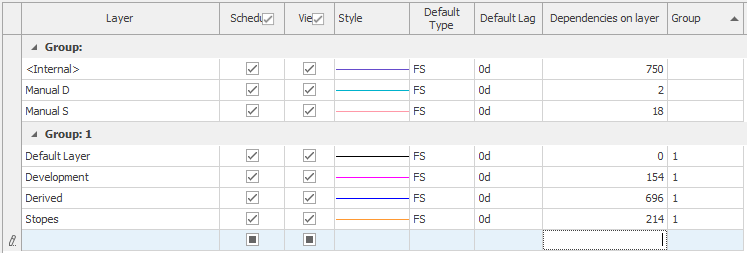
For example, in the image below, of the 7 layers available (including the default <Internal layer), four layers have been added to layer group "1" whilst 3 remain ungrouped:
- At the bottom of the screen, if you want to also use the assigned dependency layer Style to draw dependencies (overriding the formatting settings of the Bar Chart Options screen), check Use colors defined here.... If unchecked, the style set on the Bar Chart Options screen takes precedence when drawing dependencies.
- Click OK or Apply.
Related topics and activities