
Items List
The Section Viewer is organized into items. Each item contains one Isatis.neo object: either points, boreholes (with their tops, labels, trajectories, samples, markers and/or logs), meshes, polygons, polylines, surfaces (considering a constant or a variable as elevation on a 2D grid), 3D grids, 3D sub-blocks or vectors. Each item type has a specific icon:
-
 Points,
-
 Boreholes: Contains the 3D boreholes. Click on
  to expand the content of the boreholes (if not expanded) and access to:
-
 Tops: Contains the boreholes tops,
-
 Labels: Contains the boreholes labels,
-
 Samples: Contains the boreholes samples,
-
 Markers: Contains the boreholes markers,
-
Logs: Contains the boreholes logs,
-
 Trajectories: Contains the boreholes trajectories.
-
-
 Surfaces: defining a constant or a variable as elevation on a 2D grid.
-
 3D Grid,
-
 3D Sub-blocks,
-
 Polygons,
-
 Meshes: Contains the display of facets associated to the mesh.
-
 Vectors: To display rotations.
You can choose to display or not a layer by ticking or not the corresponding box. If several items are selected, the activation/deactivation will be applied to all the selected items.
Each item has its own properties which can be activated or deactivated. When working with Planes, you can choose which item is affected or not by the clipping. This property is not reachable with Fences.
All items can be selected using Ctrl+A.
Mesh surfaces (contrarily to volumic meshes - created from Domain modeling or from Create mesh from isovalue(s)), polygons, 2D grids, vectors and labels only work with Planes. These items are greyed-out when they are represented in a fence view.
Note: Use the ![]() and
and ![]() signs to expand / shrink the layer tree to display / mask the related content.
signs to expand / shrink the layer tree to display / mask the related content.
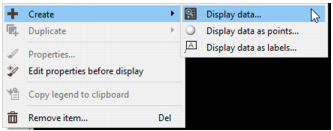
Several actions can be performed on the item. Use the item toolbar on the top, or right click on an item in the Item List to display the contextual menu:
-
 Click Create to add a new item and:
-
 Display data to add and define a new item.
-
Display data as points to display any kind of data as points.
-
Display data as labels to display any kind of data as labels.
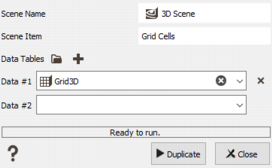
The display will use the default properties defined in the Setting up Preferences. Note that to add an item in the list, you simply need to select it in the Data tab and to drag and drop it in a 3D scene.
-
-
 Click Duplicate / Duplicate item to directly duplicate the selected item with same properties (same point size, same shape, same color (variable), labels active or not...). A new item xxx 2 will be created.
-
Click Duplicate / Duplicate item for data table(s) to duplicate the selected item but the variable which will be used for the properties can be defined on another data table. When selecting this action, a popup window will present the list of compatible data table(s) to copy to. Select the one(s) you want to base the definition of properties on. The name of the new item will use the new dataset name and if the variables defined for color, size, ... properties exist, they will be automatically selected in the properties of the new item.
-
 Click Properties to pop up the Properties Window of the current item. You may also pop up each graphic object properties dialog box by double-clicking it in the items list.
-
 Click Edit properties before display (press Shift when drag and dropping) to activate the creation mode of deactivated items with the Properties ready to be customized. There is an automatic pop up of the Properties Window for the new item. Using this mode, all the created items (with a drag and drop, or using the ’+’ button) are added to the item list but not displayed (they are unchecked). The properties are easily reachable. This mode is especially useful in case of a big dataset to apply filters. When the button is blue
  the special mode is active. Click again on the button to deactivate the mode.
-
 Click Copy legend to clipboard to copy in the clipboard the color scale used for the display of the selected variable. This one can then be copied in a Word document for example. This action is only available if a variable has been selected for the Color properties of the item.
-
 Click Remove item to remove the current item from the items list. If several items are selected, they are all deleted at once.