|
|
Studio UG Tutorial - Manual Attributes Assigning attributes interactively to loaded data |
Underground Planning Tutorial - Planning Settings
Attribution is an important aspect of underground
planning data preparation. It has a potentially significant impact
on how design definitions are applied, and the formation of resulting
activities and solids.
More About Attributes
Attributes are extra "fields" which get added to the end of the points table in the project. They are used to give scheduling activities extra information which can be used during the scheduling process, including, for example, level information, rock type, panel numbers etc. Traditionally, attributes were simply placed onto the design item strings by editing them in the 3D window. Experience has shown that it is easy to make mistakes using this method, and hence improved methods were devised to streamline the attribute application process, and reduce the risk of error.
Adding attributes to a design allows filtering of the schedule, and reporting in Studio UG. This improves the usefulness of the information derived from the final schedule. Attributes provide 'pointers' to different areas in the mine, so they can be easily located during the scheduling process. They are used to create the naming convention for each activity (mining activities and derived activities). It is the naming convention which imports the attribute information into your application.
In the following exercises, you will 'complete' your partly-attribute project data; your FXS design data (specifically, the data representing the vent structures) differentiates between risers and service access structures using the DESC field. This field is used in the filters you have already defined, and these filters are used in both naming convention and dependency assignment functions later on.
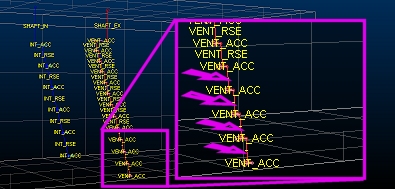
Your 'fxs_vent' fixed cross-sectional design data contains several entities relating to simple flow-through ventilation development. There are no auxiliary fan and duct systems in your example project. Two shafts (inbound and exhaust ventilation) lead to corresponding service and raises. In your data, some raise attributes are missing from the primary exhausting shaft, indicated by the purple arrows below:
In this exercise, you will use the Manual Attribute Assignment panel to add the appropriate DESC attribute to these string entities, thus completing the attribute setup for your design data.
Prerequisites
-
You have completed the previous section (Interrogation Rules).
-
The 3D window is displayed.
-
You are familiar with using the Sheets control bar to enable and disable object overlays. More...
-
You are familiar with 3D window view manipulation tools such as zooming and panning.
Exercises in this section
This section contains the following exercises:
Exercise 1: Load and Review Design Data
- Using the Planning ribbon, select Design.
- The Manual
Attribute Assignment panel is displayed.
All system and custom attributes currently assigned to your project can be seen in the Attribute drop-down list. The attributes in this list mimic the contents of the Edit Attributes panel used in a previous exercise (this panel is also accessible from the Manual Attribute Assignment panel, but as you've already defined your attributes for the project, you won't be needing it).
Select [DESC] from the Attribute drop-down list. - Note that, at this point, nothing else on the
Manual Attribute Assignment
panel changes; only attributes associated with loaded data are
displayed here.
Click Load Designs using the button in the top-left corner: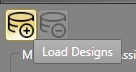
Several Studio UG functions operate in one of two modes; where design data is loaded and where data is unloaded. In some cases, for example, you have to load data in order to perform interactive functions upon it, or you have to unload data first in order to edit object values. Studio UG will let you know if you're in the wrong mode for a particular function.
Loading the designs populates the Current Values list with all currently assigned (unique) values. These are the values found in all of the design data you specified on the Project Settings panel (where a DESC attribute can be found).")
It doesn't matter if you load your designs, then select an attribute, or do it the other way round. If you already have designs loaded, for example, the Current Values list will update instantly when a new Attribute is selected.
- By loading your designs, you can see all of
your design data (four FXS files and one wireframe file):
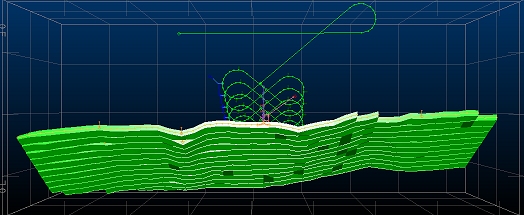
- There's too much data on screen; you're only
interested in the ventilation infrastructure strings.
Using the Sheets control bar, disable the view of the following data:
fxs_decline (strings)
fxs_levels (strings)
fxs-oredev (strings)
stopes_tr/stopes_pt (wireframe) - Zoom all
data and you should be looking at something similar to this:
The pink/red data represents the ventilation exhaust plan for your project, consisting of a primary exhausting shaft, and alternating service and vent raise structures that ultimately connect to each of the level drives leading into the ore development strings. - At the bottom of the panel, in the Labels section, select [DESC] from the drop-down list.
- Select the Show Labels check box to update the screen.
- Zoom in on the lower half of the exhaust ventilation
string object. You can see that four of the string entities in
the lower levels are not currently assigned a [DESC] attribute:
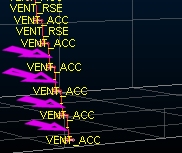
In the next exercise, you'll manually assign attributes to these strings to designate them as vent raises for the exhaust infrastructure.
Exercise 2: Assign Attributes Using Filtering
Studio UG's attribute assignment functions work on the premise of "pick your data, then assign attributes" or alternatively; "filter your data, then apply an attribute to anything that's visible".
In this exercise, you're going to use the Quick Filters control bar and adopt the latter approach (although for this kind of data, both methods are arguably as quick as each other, it will depend on the type/complexity of data loaded as to which one you choose in live operations).
- With your labelled vent data displayed, expand
the Quick Filters control
bar on the right of the screen:
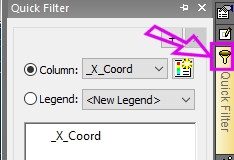
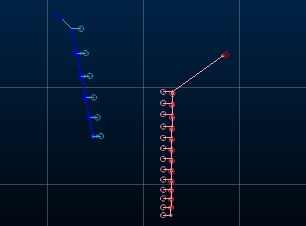
- Select the [DESC] attribute from the Column drop-down list.
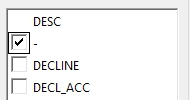
- You want to display only data for which the
DESC attribute is absent, so using the table below, select the
topmost item (only):
- You're now looking at the part of your ventilation
fixed-cross-sectional data that doesn't currently have an assigned
DESC attribute:
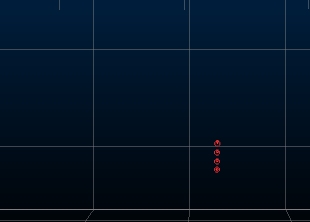
- Zoom all data to maximize the 4 string items in the 3D window.
- Back in the Manual
Attributes Assignment panel, you'll notice that all of
the previously listed values for DESC
have disappeared; this is because the list only shows values for
unfiltered data.
In the New Value field, enter "VENT_RSE". - Click Apply to Visible.
- The strings disappear from screen - this is
because the currently-applied filter (show absent data only) can
no longer be matched to any loaded data.
Activate the Format ribbon and select Filter | Erase All: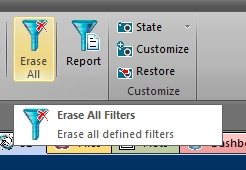
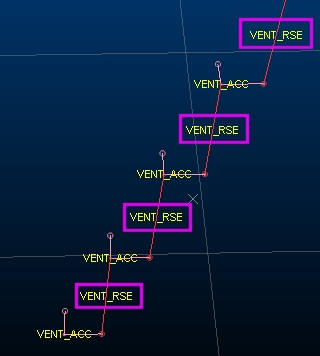
- Your ventilation strings reappear, displaying
the DESC values for your
string. Specifically, zoom in and rotate the view to check that
your newly-applied attributes have been assigned like this:
- At this point, only the data held in memory
has been updated. You need to commit these changes to your design
data files.
Click Save Designs. - Generally, loaded data needs to be unloaded
before you change between planning tasks.
Click Unload Designs: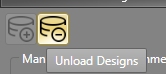
- Close the Manual Attribute Assignment panel using the "x" in the top-right corner.
- Save your project.
