
Using the Screen Interface
Overview
This section describes some of the components of the CCLAS screen interface. It also describes the functionality of the components and how they are used within CCLAS.
Depending on the application launched, the screen displays a number of different components designed to help you carry out a task. The components used in an application can be moved around, renamed, removed and so on.
Process
Accessing Flows from a Screen
Application Toolbar
Every application in CCLAS 6 displays a toolbar. The buttons that display on the toolbar change depending on the accessed screen, your security access, and the current point within the application.
Below are the most commonly used buttons that display on the application toolbar.
|
Button |
Description |
|---|---|
|
|
Saves the data entered and remains on the current screen. |
|
|
Reloads the current page you are viewing. |
|
|
Clears all your current changes and returns to the first screen in the sequence. |
|
|
Displays the screen to create a new item related to the application. |
|
|
Creates a new item based on the information provided by an existing item. |
|
|
Displays a dialog box to confirm deletion of the current item. |
|
|
Display a dialog box that allows you to open an existing entity. |
|
|
Displays the search results in the grid after entering the search criteria. |
|
|
Shows a saved search menu where you can add, rename and delete saved searches. |
|
|
Clears search results and search criteria. |
|
|
This button displays in the toolbar if you re-size your screen to a smaller size and all of the available buttons cannot be displayed in the toolbar. The Actions button lists all actions available to you for the application entered. This icon can also display in a grid where an action menu is available for the row. |
Keyboard Shortcuts
The following keyboard shortcuts are supported in CCLAS 6.
|
Key combination |
Description |
|---|---|
|
Ctrl+Shift+S |
Perform a search or submit of the page. |
|
Ctrl+Shift+N |
Create a new record. |
|
Ctrl+Shift+W |
Load a new search. |
|
Ctrl+Shift+R |
Refresh the current form. |
|
Ctrl+Shift+O |
Show the Open dialog. |
|
Ctrl+Shift+D |
Delete the current record, or where the record resides in a grid, then delete the selected row. |
|
Ctrl+Shift+L |
Perform a lookup on the focussed field, if Lookup is available. |
|
Ctrl+Shift+U |
Focus the Quick Launch field. |
|
Ctrl+Shift+(+) |
Create a new row in the selected grid. |
|
Ctrl+Shift+(-) |
Delete the selected row in the selected grid. |
|
Ctrl+Shift+F11 |
Enter/Exit full screen mode. |
Visibility of Action Flows on a Screen
Visibility of action flows on the UI, and whether a user has permission to execute an action flow via a service, depends on the class access and permissions of the user. For example, more buttons may display on an Update screen than on a Create screen. Access to fields on this screen depends on user permissions as set up by your system administrator.
Form flow buttons are displayed in the top-left of the application screen toolbar. An ![]() Actions button displays where the size of the screen does not allow form flow buttons to fit in the toolbar. Click this button to display additional form flow buttons.
Actions button displays where the size of the screen does not allow form flow buttons to fit in the toolbar. Click this button to display additional form flow buttons.
Configuring Defaults on Screens
A Search screen and a Create screen can be configured with default values.
Once an application is configured with default values, the application defaults can be saved at the following level:
- User (highest)
- Role
- Laboratory
- System (lowest)
Notes:
-
If you do not have security access to the Defaults menu, then the default option does not display in the application preferences.
-
If you do not have security access to an item in the Defaults menu, then the item does not display in the menu.
-
Defaults are only available in an application (CC or MSE).
Application defaults can be saved, applied, cleared or deleted for a given role or for the laboratory.
Where a field can have multiple entries, indicated by the Multi-select ![]() icon, then multiple defaults are possible.
icon, then multiple defaults are possible.
Saving default values stores all values that are currently populated on the screen. The next time the screen is accessed, then the saved defaults display automatically.
Clearing default values temporarily removes them, however, they are reinstated once the screen is closed and re-opened.
Deleting default values permanently removes them from the screen.
 Maintain application default values
Defaults are applied on page load in order of scope: User > Role > Scope > System. If there are no default values with user scope, then the server attempts to load the role default values. The role selected for defaults in this scenario is chosen using these rules:
- Identify all roles associated with the user's current scope
- Identify all role based defaults defined in the MSEPRF—User Preferences application
- Find the roles that overlap between the above two steps
- Choose the defaults for the role that comes first alphanumerically in the list of overlapping roles.
Note: The alphanumeric ordering is case sensitive, comparing two strings lexicographically. The comparison is based on the Unicode value of each character in the role names.
If there are no default values with user or role scope, then the server attempts to load the laboratory default values. If there are no default values with user, role or laboratory scope, then the server attempts to load the system default values.
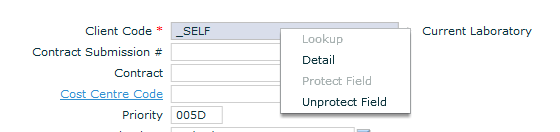
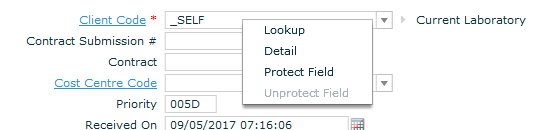
The default feature also allows fields to be protected and exposed. If a field is protected, then data cannot be entered or overwritten in the field.
The default values can be protected for the following levels:
- User
- Role
- Laboratory
- System
Note: If the field cannot be protected, then the protect/unprotect option is disabled.
Protect or expose fields using application defaults.
Dialog Boxes for Filter and Sort
When performing an action in some CCLAS 6 screens (for example, entering or selecting search criteria to display matching items) the results display in a filter dialog box when multiple items are returned. The number of items in the result set displays in parentheses in the dialog box title.
Filter Result Data
The ![]() Filter button that displays in some CCLAS grids makes it easier for you to find the data you need. Click the filter icon to display entry fields under the column names where you can enter column attribute characters to further filter your search. For example, if you are searching for an Equipment Reference of WATER PUMPS, begin entering the characters into the column entry field. Only results containing the characters entered display in the results grid.
Filter button that displays in some CCLAS grids makes it easier for you to find the data you need. Click the filter icon to display entry fields under the column names where you can enter column attribute characters to further filter your search. For example, if you are searching for an Equipment Reference of WATER PUMPS, begin entering the characters into the column entry field. Only results containing the characters entered display in the results grid.
When you enter characters in the column entry field, ![]() Contains displays beside the field. Click the icon to display a list of filter icons which you can use to refine your search.
Contains displays beside the field. Click the icon to display a list of filter icons which you can use to refine your search.
Available Filter Icons
| Icon | Description of the applied filter |
|---|---|
|
|
None—Display all items. Note: This icon displays when no text is entered in the filter field. |
|
|
Greater Than—Display only items with values greater than the value entered in the filter field. |
|
|
Greater Than or Equal—Display only items with values greater than or equal to the value entered in the filter field. |
|
|
Less Than—Display only items with values less than the value entered in the filter field. |
|
|
Less Than or Equal—Display only items with values less than or equal to the value entered in the filter field. |
|
|
Contains—Display only items with values which contain the text entered in the filter field. |
|
|
Does Not Contain—Display only items with values which do not contain the text entered in the filter field. |
Fields
The fields in a CCLAS 6 application behave in a number of different ways. The behaviour depends on:
- The type of screen you have accessed.
- The security access you have in the application.
- Data entered into an associated screen.
- Settings in the system control files.
- Settings from preferences for the session.
- Modules turned on or off.
- Client-side behaviour.
Note: The allowable formatting for a field (for example, letters, numbers, full-stops commas, and so on), is not validated until after the data is entered.
The text boxes that display next to a field label indicate if:
- you can enter data into the field
- the field is protected or read only
When completing fields, entry of data into one field may disable the ability to enter data into another.
Example of an entry field:

Read Only/Display Only Fields
Fields which are read-only cannot be updated and display greyed out.
Field Defaults
Fields can be pre-populated with default values.
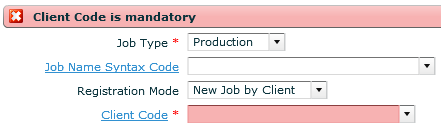
If a field is mandatory, a red asterisk displays next to the field label. Some fields may become mandatory as data is entered into the screen. If these fields are not completed, CCLAS displays an error indicating where the mandatory information must be entered.

Another feature of the CCLAS screen interface is the ability to launch a search application associated with a field. This is provided by the Field Tag![]() displayed at the end of a field text box. The field tag also provides access to details associated with the field.
displayed at the end of a field text box. The field tag also provides access to details associated with the field.
Field Tag—Lookup—Detail—Navigate
Lookup, Detail, and Navigate functionality is available in CCLAS 6 applications.
Using this functionality, you can look up other applications to obtain the field value or access details or relationships of a field value. Lookup, Detail, and Navigate (where available) can be accessed by clicking the ![]() Field tag displayed at the end of a field text box.
Field tag displayed at the end of a field text box.
Note: This functionality is only available on fields that display the field tag. Not all field tags display all options.
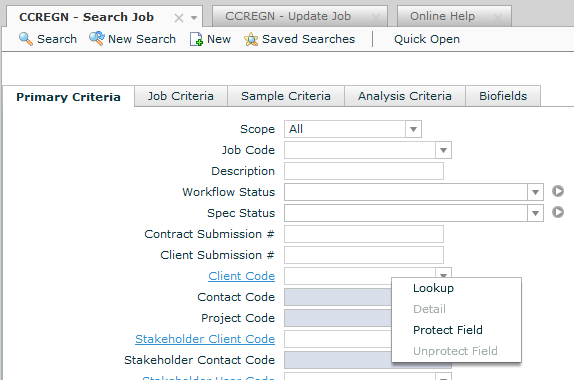
By selecting Lookup from the field tag option, the search application associated with the field value displays. For example, if Lookup is selected on a field value of Client Code, the CCCLNT—Search Client screen displays and you can search for the required client code. Alternatively, if the field label displays a hyperlink, double-click on the link and the associated screen displays.
Note:
Where an application has a lookup field that can launch a Search application, application defaults are in place in the Search application, and other request pairings are supplied to the lookup, when the lookup is activated and the Search application is launched, then the application defaults are applied in the same way as if the Search application was launched from the menu.
For example, launch the CCREGN—Job Search application from the menu or quick launch, set some search criteria defaults and save the defaults against the current user. Restart the CCREGN—Job Search application to see that the defaults are applied automatically. Then launch the CCWKBK—Workbook Search or CCJAUD—Job Audit application and access the quick lookup from the Job Name field to launch the CCREGN—Job Search application to see that the application defaults are applied in the same way as if the CCREGN—Job Search application was launched from the menu.
The search screen displays in a tiled format so that both application screens are visible.
By selecting Detail from the field tag option, the detail application associated with the field value displays. For example, if Detail is selected on a field value of Client Code, the CCCLNT—Client Detail screen displays where you can view the client details.
Selected Items Drop-down (using Input Assistance)
Some fields allow for the selection of multiple items. Click ![]() Multi-select from list to view the selected items drop-down.
Multi-select from list to view the selected items drop-down.
Note:
![]() Multi-select from list does not display next to fields for which multiple selection is not possible.
Multi-select from list does not display next to fields for which multiple selection is not possible.
Multiple criteria are applied as "Or", and can use wildcards. Example: Where "A%, B%, %D, E%F" is entered as the search criteria in the field, records matching A% or B% or %D or E%F in the related column are returned from the search.
Where nothing is selected, then the selected items drop-down is empty.
![]()
Where one or more items are selected, then the selected items drop-down displays the selected items.
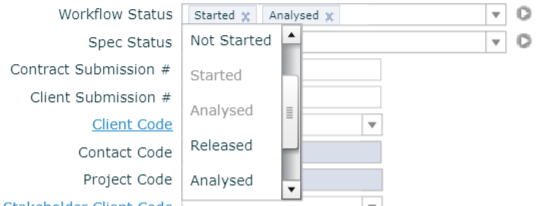
Where many items are selected but the names of the items are too long, then only the first few items can be seen in the field, however the selected items drop-down displays all selected items.
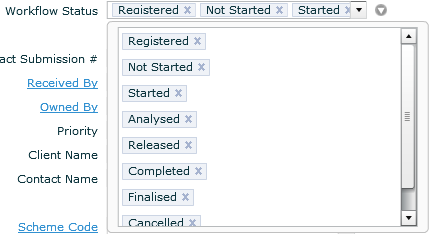
Click X to de-select any item from the selected items drop-down.
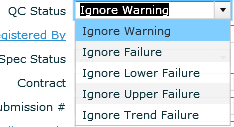
Field Drop-Down Lists
Field text boxes that contain drop-downs allow you to select from a list of available values. Once selected, a description of value displays beside the text box. Some drop-down lists allow you select more than one value. All selected values display in the field. To remove selected items, click X to the right of each item.

You can also enter data into the drop-down fields. As you begin to enter characters into the field, the CCLAS auto-complete functionality tries to predict the value and offers possible matches.
Entering Text into Rich Text Fields
Some note fields in CCLAS are rich text fields that are can be formatted.
Format entered text using the toolbar. HTML formatted text can be pasted from one CCLAS rich text notes field into another rich text notes field, such that, the formatting is preserved.
Canned comments are used to assist with the entry of formatted text into various note fields using pre-configured canned comments. Refer to Maintaining Canned Comments.
The selection of a canned comment for a particular note field is context-aware. The drop-down list of available canned comment codes is filtered based on the scope of canned comment with respect to the type of note field being updated, either by:
- The Canned Comment Type of GLOBAL, JOB, SAMPLE or SCHEME, and the Canned Comment Subtype of GLOBAL, REGISTRATION, RECEIPT, ANALYSIS, RELEASE, VALIDATION, REPORT or INVOICE.
or:
- The list of category codes entered in the Category Code. The category codes are initially populated from the categories whose code appears in the related preference, where the preference changes according to the particular notes field being updated:
- NOTES_JOB_ANALYSIS_CATEGORIES
- NOTES_JOB_PREPARATION_CATEGORIES
- NOTES_JOB_REGISTRATION_CATEGORIES
- NOTES_JOB_REPORT_CATEGORIES
- NOTES_JOBSCHEME_ANALYSIS_CATEGORIES
- NOTES_JOBSCHEME_REPORT_CATEGORIES
- NOTES_JOBSCHEME_RESULT_CATEGORIES
- NOTES_SAMPLE_ANALYSIS_CATEGORIES
- NOTES_SAMPLE_PRODUCT_CATEGORIES
- NOTES_SAMPLE_REGISTRATION_CATEGORIES
- NOTES_SAMPLE_REPORT_CATEGORIES
- NOTES_SAMPLESCHEME_ANALYSIS_CATEGORIES
- NOTES_SAMPLESCHEME_REPORT_CATEGORIES
- NOTES_SAMPLESCHEME_RESULT_CATEGORIES
- NOTES_SAMPLESCHEMEANALYTE_REPORT_CATEGORIES.
Entering Text into Multi-Language Fields
Where multi-language preferences and availability are configured for the laboratory, certain fields provide multi-language input.
Enter text into multi-language fields
When generating reports, the report template's language is used to extract the content in the appropriate language for any multi-lingual field.
When drafting invoices, the invoice is 'flattened', such that, the content for the appropriate language is extracted for any multi-lingual field used to populate the invoice.
Selecting Dates and Times
Laboratory Time Zone
A laboratory must have a time zone configured if a user who is logged into that laboratory wishes to see date and time fields display date-time content relative to the laboratory. If a time zone is not defined for the laboratory, a user who is logged into that laboratory see date and time fields displaying date-time content relative to the server.
Available time zones are configured in the CC17 Table File in the MSETBL—Table Code Service application, for example, Australia/Brisbane or Europe/Madrid.
Display and Persistence of Date and Time Fields based on Time Zone
When a user logs in to a laboratory from anywhere in the world, then all samples they register, reports/invoices they print, application grids they view, audit records they cause to write for job-based data or for static configuration, batch queue processes they trigger, system date-time properties, carry the date-time that is local to that laboratory. The laboratory's current time is derived by first obtaining the server date-time and then applying an adjustment based upon the difference between the server/database's time zone and the laboratory's time zone. If the laboratory does not have a time zone defined, then the laboratory's current time is set to the server time.
All date and time fields use the Timestamp data type.
The selected time zone for each laboratory is only refreshed once every 15 minutes for performance reasons, timed using the server clock's fifteen-minute timer (5:00, 5:15,5:30,5:45,...). Therefore a change in a laboratory's Time Zone does not take effect until the server's clock has counted 15 minutes.
All date and time fields displayed in the interface are displayed in the time zone denoted by the laboratory's Time Zone.
All date and tune fields that are persisted to the database are stored in the time zone denoted by the laboratory's Time Zone.
A laboratory's Time Zone is selected from the standard list of time zones that Java can accept, that is, all adjustments for daylight saving changes are managed by the system.
Example: Where a laboratory is operating in the 'Australian—Central Standard Time' time zone, select the laboratory's Time Zone as 'Australia/Adelaide'. Then, when daylight saving comes into effect, Java performs the adjustments automatically so that the user interface shows times in the daylight saving adjusted time, whereas the database stores the time in the unadjusted standard time.
This means that no matter where in the world a user is located, and regardless the time zone for which their computer is set, when the user logs into CCLAS and selects a log-in laboratory, then all jobs and samples they register, all data they view in forms, and all reports and invoices they generate, display date and time fields relative to the laboratory's Time Zone.
Example: Where the BNE laboratory is located in Brisbane, Australia, and therefore configured with the 'Australia/Queensland' Java time zone, when a user in Perth, Australia, logs into the BNE laboratory, and it is 2pm in Perth and 4pm in Brisbane, then any samples that are registered into the BNE laboratory have a Registration Date of 4pm, and all forms that display that sample show the Registration Date of 4pm, and all reports show the Registration Date as 4pm.
Any report that includes data from more than one laboratory that have differing time zones must use a report script using DSC to convert the data from each laboratory's Time Zone to the common time zone used for the report. (The Java Time Zone class is helpful when doing calendar arithmetic across time zones.)
Format of Date and Time Fields
The format in which dates and times are displayed in date and time fields in CCLAS applications is controlled by your internet browser settings. If this is changed, ensure to clear the browser's cache to force a refresh.
Date Fields
All date fields in CCLAS display a calendar icon. This icon displays beside the field which requires a date to be entered.
A date can be selected from the pop-up calendar or you can enter the date into the field.
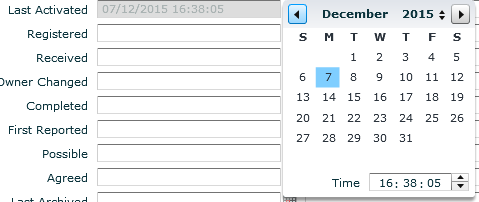
Time Fields
Time can be entered in to time fields or you can use the up and down buttons at the end of the time field. The tab key can be used to move between time segments. The time format is HH:MM:SS.

Time fields default to the current time in the laboratory. To enter a different time, click in the time field or click the up and down arrows prior to selecting a date.
Uploading Files to CCLAS Entities
Various types of CCLAS 6 entities allow for file upload, for example, a document or image, as a field in a form, in a dialog or in a grid.
When a file is uploaded and attached to a CCLAS object:
- The actual image binary file is stored via the ImageService into the MSF053 table.
- The ImageGalleryService has a table named MSFIMG that stores the image relationship with the application, that is, it holds a record which records the Primary ID of the object, along with the Service.
- The ImageGallery is persisted via ImageGalleryService in m1000. The UI is clever enough know the primary key of the application, and the name of the application.
- DO NOT be confused by MSE1CJ with ImageGallery as they are 2 different services/applications. MSE1CJ is more a custom type of application, but ImageGallery is more of a generic solution.
- ImageGalleryService is more tied to the application primary key (done automatically by the UI widget).
For example, if an image is uploaded for a client, then:
- The MSF053 table holds:
- MSF053.MEDIA_NAME—The name of the original filename uploaded.
- MSF053.MEDIA_UUID—The cross-reference ID between MSF053 and MSFIMG.
- MSF053.MEDIA_DESCRIPT—The description (mandatory on the image gallery) of the image.
- MSF053.MEDIA_SOURCE—I (Image)
- MSF053.MEDIA_TYPE—I (Image)
- The MSFIMG table holds:
- MSFIMG .PRIMARY_KEY—The CCCLIENT.ID of the client record updated.
- MSFIMG .SERVICE_NAME—The service that attached the image, for example, com.mincom.ellipse.service.m2000.ccclient.CCClientService.
- MSFIMG .MEDIA_ID—The ID of the image stored in the MSD053 table, as well stored in some other EFS or CLOB environment.
- MSFIMG.IS_DEFAULT—Y if the image is the current default, N if the image is NOT the current default.
Error Messages and Warning Messages
Error messages display under the screen toolbar and are highlighted in red. Single or multiple messages may be generated and may identify where the error has occurred, for example in a field, if incorrect data is entered. In this case, the ![]() Copy the Error clipboard icon displays in the top right of the screen beside the error message. Click this icon to copy the contents of a message to email for further action.
Copy the Error clipboard icon displays in the top right of the screen beside the error message. Click this icon to copy the contents of a message to email for further action.
A warning message displays as a confirmation dialog box, with a Confirm and Cancel button.
- When Confirm is clicked, results in the warning are ignored and the update is saved.
- When Cancel is clicked, the dialog box is closed, but the warning continues to display until the appropriate action is taken.
- Getting Help for CCLAS
- Logging in to a Laboratory
- Using the Homepage
- Performing Searches
- Working with Activity Statuses
- Working with Scope and Codes
- Exporting Grid Content to a Spreadsheet
- Configuring CCLAS Menus
- Personalising Screens
- Customising Screens
- Maintaining Customised and Personalised Screens
- Maintaining Category Types
- Reporting in Alternate Languages
- Activating System Languages
- Maintaining System Table Codes
- Maintaining System User Preferences
- Maintaining Application Preferences
- Maintaining System Table Localisations