
Creating and Editing Stereonet Charts
To access this screen:
-
In the Plots window, click Insert >> Chart >> Stereonet.
Stereonet plots can be created as chart sheets in the Plots window or inserted as plot items into existing plot or log sheets. The Stereonet screen is used to create stereonet charts by selecting structural data, defining chart parameters, and creating sets, planes, and cones.
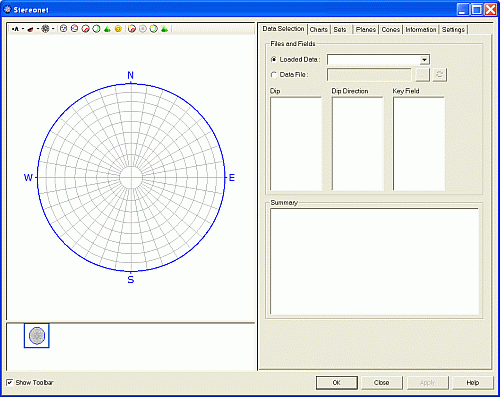
The Stereonet screen
To configure a stereonet chart:
-
Select whether to display the Stereonet toolbar using Show Toolbar in the bottom left of the screen.
The toolbar provides buttons for changing stereonet settings and adding sets, planes, and cones to the plot. Many toolbar functions are also available from the dialog tabs.
-
Use the Preview Pane to review the new or modified stereonet plot.
Note: Right-click the Preview Pane to open the context menu.
-
Use the Chart Thumbnails Pane to select a chart thumbnail.
The selected chart displays in the Preview Pane.
-
On the Data Selection tab, select the structure data points from loaded data or a file.
Select the dip direction, dip, and optional key field. See Stereonet Data Selection.
-
On the Charts tab, select the chart display settings.
Show or hide poles, planes, and contours. Define the projection, net, hemisphere, grid, and colour settings. See Stereonet Charts.
-
On the Sets tab, create sets and define their display settings.
You can define colour, line thickness, average plane, and daylight envelope settings. See Stereonet Sets .
-
On the Planes tab, create planes and define their display settings.
You can define average plane and daylight envelope settings. See Stereonet Planes.
-
On the Cones tab, create cones and define their display settings.
You can define cone colour and line thickness settings. See Stereonet Cones.
-
On the Information tab, review the current settings, loaded data statistics, and selected data statistics. See Stereonet Information.
-
On the Settings tab, define distribution, counting circle size, and default colour settings.
See Stereonet Settings.
Note: The Stereonet dialog is modeless. You can leave it open while you run commands in other windows.
To insert a stereonet chart as a plot item:
Activity Steps:
- Display the Plots window and Manage ribbon.
- Enable Layout Mode. See Page Layout Mode.
-
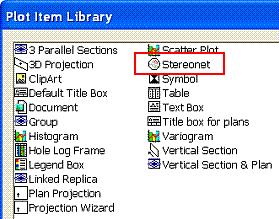
Right click a plot projection and select Insert to display the Plot Item Library:
-
Select Stereonet and click OK.
The Stereonet screen displays.
-
Define your stereonet and click OK to add it to the current plot sheet.
Note: To create a stereonet chart, define at least the Files and Fields parameters on the Data Selection tab before you click OK.