
Machine Types and Classes
To access this screen:
-
Activate the Schedule ribbon and select Setup. Select any machine class on the left.
-
On the Update Schedule screen, enable the Machines option and click Browse.
Use this screen group to manage machines by adding, editing, and deleting machine types and their machine classes.
Note: The fields you can access on the Machine Class Settings and Auto Scheduler Settings screens depend on how you opened the screen. If you access it from Schedule >> Setup, you can access all relevant functionality (although some options depend on other properties being enabled). If you access it from the Update Schedule screen, you can edit quantitative values, but not other settings.
Machine classes are typically associated with planned material scheduling activities, such as drill rigs, loaders, excavators, dozers, and crushers. Do not use this screen to define haul trucks and their associated parameters. For more information, see Managing Haul Trucks.
Machine classes are used to perform activities. They are grouped into machine types.
Machine class settings include rate per hour, adjustment fields such as utilisation, and selection of a maintenance calendar. The schedule is organised by machinery. Each machine type has its own schedule of tasks within the period. These tasks are time-based, but happen within the period they are assigned.
Machine types represent a broad group of equipment performing a similar task, and each type contains machine classes. These are the individual machines that do the mining and are associated with a rate, capacity, and related settings.
More Information
Press <F1> in any screen to show context-sensitive help, or use the Table of Contents on the left to refer to a particular topic.
Alternatively, select a link below:
-

 Machine Class Settings
: define machine class parameters and symbol display options. See Destination General Settings.
Machine Class Settings
: define machine class parameters and symbol display options. See Destination General Settings.
-
Auto Scheduler Settings
(loaders only): set up auto scheduler rules that apply only to the selected loader class. See Destination Throughput/Recovery.
Existing Machines
Previously defined machine classes appear in the menu system on the left and are either Loader or General type.
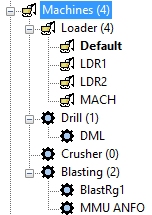
Select a machine class to show its properties on the right.
Activity steps:
- Display the Machine Types and Classes screen.
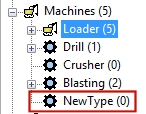
- To add a new machine type (non-loader machine types only), in the menu on the left, right-click Machines and select Add.
- Right-click the new machine type and select Rename.
-
To add machine classes to the new machine type, right-click the new type folder and select Add.
- To add a new loader machine class, right-click the Loader item, select Add, then select the new loader and define its settings on the Machine Classes screen. Optionally define Auto Scheduler Settings.
- To add a non-loader machine class, right-click any non-loader machine type item in the Machines category (representing a machine type), select Add, then select the new machine class and define its settings on the Machine Classes screen.
Note: To delete a machine class or machine type, right-click an existing item in the menu on the left and click Delete. You can only remove a machine type if it contains no machine classes.
Related topics and activities