
Scheduling Data Setup
To access this screen:
- Activate the Schedule ribbon and select Setup >> Setup.
- On the Update Schedule screen, browse for a Calendar (restricted functionality).
- On the Update Schedule screen, browse for a Destination (restricted functionality).
- On the Update Schedule screen, browse for a Machine (restricted functionality).
- On the Update Schedule screen, browse for a Truck (restricted functionality).
- On the Update Schedule screen, browse for a Target (restricted functionality).
Use the Scheduling Setup screen to load and save project settings, define scheduling data objects, set how fields are treated, and define bench settings. You can also configure planning calendars, machinery and haulage settings, define operational constraints and activities, and export data to other systems.
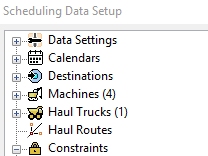
The Scheduling Data Setup screen sidebar
Each tab on the left of the screen displays a categorised set of tools used to define how your schedule will be calculated. What is initially displayed depends on how you open the screen.
Note: If you access this screen from the Update Schedule screen, some settings on this screen are disabled. Only quantitative destination settings are editable, such as a destination’s Maximum Capacity and Processing Capacity. In addition, non-relevant items in the menu on the left are hidden.
Managing Schedule Components
A schedule component is an element of your schedule that you can define independently, including:
- Maintenance Calendars.
- Destinations.
- Machines.
- Haul Trucks.
- Activities.
In general, you create a new project component by right-clicking the corresponding container folder and selecting Add.
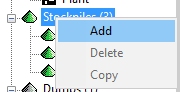
Then define the new parameters and apply them to the new component.
For existing components, you can right-click to Copy or Delete. Use Copy, for example, if you need to add a new stockpile destination with the same settings as an existing one.
|
Data Settings: Define which data is used to process a schedule and how data fields are interpreted within your schedule calculations. Use this screen to determine data validation and export schedule settings. |
|
|
Calendars: Configure period settings for the project, set up your mine calendar and define the maintenance calendar or calendars for your project. |
|
|
Destinations: Add, edit, or delete destinations for scheduled material. Destinations are the end points in the scheduling of materials, for example waste dumps, stockpiles, and processing plants. |
|
|
Machines: Manage machines by adding, editing, and deleting machine types and their machine classes. |
|
|
Haul Trucks: Add, edit, and delete haul truck classes and their associated parameters. |
|
|
Haul Routes: Add, edit, or delete location node and connectivity parameters for bench exits, intersections, destinations, dump points, roads, and sectors. This area is also used for importing and exporting haul route data. |
|
|
Constraints: Set up non-negotiable constraints for your project. Define destination and or global targets, filters, and dependencies. |
|
|
Activities: Add, define, and delete the different types of scheduling activities, and the order in which they occur. |
|