|
|
Pit Design Tutorial - Fixed Road Design Automatically generating a fixed road |

Pit Design Tutorial - Fixed Road Design
This tutorial explains how to add a fixed road to your automated pit design following the design of a new pit base string over an existing design.
All work is carried out in the Auto Design task, but no previous pit design settings are used. It is important that you have completed the prerequisite exercises, which ensure the correct data is defined for your pit, plus the precursor pit design settings such as slope region information and contour strings.
Some of the exercises are similar to those carried out in the Automatic Design tutorial.
Prerequisites
-
You have completed the following tutorials:
Exercise: Creating the initial designed phase shell
In this exercise, you will create a simple pit project (bottom-up design), containing no other features. This shell will be modified in a subsequent exercise to include a fixed road.
- Using the Design ribbon, select Auto Design.
- The Auto Pit Design task is displayed, as are the contour strings generated earlier. If you hadn't already defined everything you need to use the automated design tools, you would be prevented from accessing the task.
- Select [P1_PH1] from the Phase drop-down list. This will automatically load the contour strings from the Create Phase Contours tutorial.
- Zoom-all so you can see all contour strings:
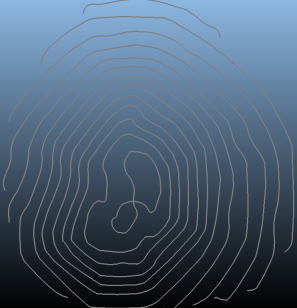
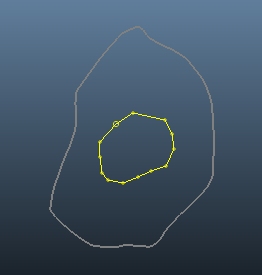
- Select the contour string shown below (left-click).
This will become your pit base string. The lower contours are
not of a suitable area/shape to use as a pit base:
- Click Add selected string(s). This adds the selected string to the pit constraints, meaning that Studio will attempt to honor the shape of the string (providing slope angles and widths allow it) and incorporate some or all of the string shape within the generated pit.
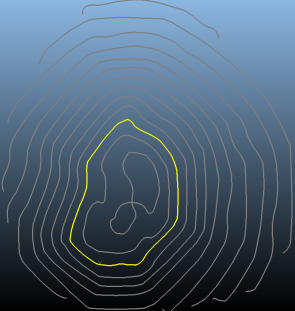
- Disable the Show
Phase Shell Contours and enable the Show
Pit Constraints check box. A single string (the one you
selected previously) should now be displayed.
These are the constraint strings defined so far. In this case, only 1. - Click Recalculate
and a series of pit design strings are generated, with each 'raise'
of the pit being made to correspond with each bench definition:

- Disable the Show Phase Shell Contours check box.
- Disable the Show Design Strings check box.
- View the data in plan view and zoom in to
see the pit base string:
- The pit base string is at the 20m elevation
(Z). For this example, you're going to create a lower string to
create the new pit base. This will then be accessed using a fixed
road.
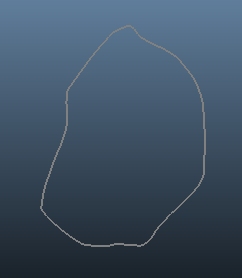
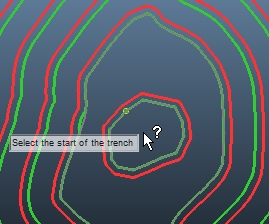
First, use the Bench Clipping toolbar to select the 0 Bench (20 meters below the current pit base string).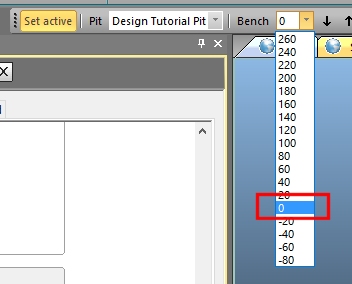
This sets a new section plane on which to digitize. - Use the New
String command (ns) to digitize (left-clicking) a closed
string similar to that shown below (it doesn't have to be exact):
Make sure your string is closed by selecting it and using the quick key 'clo'. - Make sure the newly-digitized string is selected and click Add Selected String(s). This transfers it into the constraint strings collection.
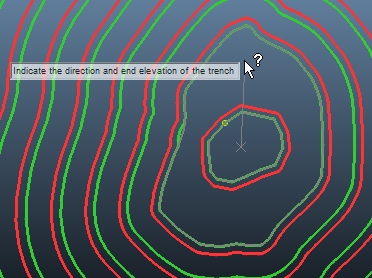
- Click Recalculate
to see the new pit base:

- To create a fixed road, you must specify the start position, the gradient and the direction. With the plan view still enabled, use the Auto Pit Design panel to enter a New Fixed Road Name of "Fixed 1".
- Change the Gradient from the default to "10" degrees.
- Change the Road Width to "8".
- Click Choose
Start Point and left-click approximately in the position
shown below:
- Use the Bench Clipping toolbar to select the 20m bench.
- Left-click in the location shown below -
this ensures the ramp terminates at the 20m bench:
- Click Recalculate
to see impact on the design strings:
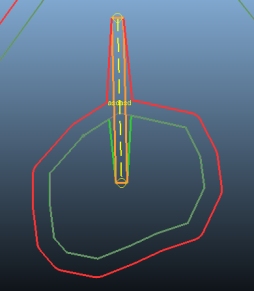
- Select Insert
Curve and select the uppermost and lowermost points of
the new dotted line (the fixed road centreline) move the curve
adjusters approximately as shown below. The curve preview should
show an 's' shape:
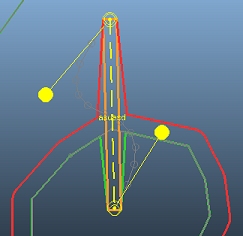
- Press <Enter> to update the fixed road centreline and click Recalculate to update the design strings.
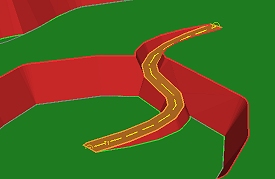
- Click Make
Design Surface and view your result:
- Save your project.
This concludes a simple run-through of the automated pit design tasks in Studio OP. There are many more functions and settings not covered here; for more information please refer to the context-sensitive help for each panel, or any of the conceptual topics in the Table of Contents.