|
|
Creating a Pit Base String How to create a base perimeter string for the pit design |

Overview
In this part of the tutorial you are going to create a perimeter string for the base of the open pit design string model.
This string will be used as a starting point for designing your pit benches in an upward direction.
Prerequisites
Required:
-
Created a new project and added all the required tutorial files i.e. the exercises on the Creating a New Project page.
-
Loaded and viewed the ultimate pit shell model data i.e. the exercises on the Viewing Ultimate Pit Shell Models page.
-
Created and applied a custom legend, filtered cells, for the NPVS block model i.e. the exercises on the Creating a Custom Display Legend page.
Recommended:
-
Specified project and mine design settings i.e. the exercises on the Specifying Design Settings page.
Files required for the exercises on this page:
-
_vb_npvmod1
Exercise: Creating a Pit Base String
In this exercise you are going to create a base perimeter for the open pit design string model at the -40m elevation, using the filtered NPVS block model to define the limits. This will include the following tasks:
-
Defining data and design plane settings
-
Creating a new strings object
-
Drawing the base string by snapping to grids
-
Saving the new strings object to a Datamine file
-
Checking the string coordinates.
|
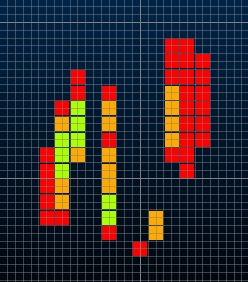
The model is currently colored by the SEQUENCE field which defines the optimal NPVS extraction sequence for the blocks. The block model extents of the pit shell indicate that the pit base is at an elevation (Z value) -40m. |
Defining Data and Design Plane Settings
-
Display the 3D window.
-
Display the Sheets control bar..
-
Display only the following 3D overlays:
-
Default Grid
-
_vb_npvmod1 (block model)
-
-
Expand the Sections folder and double-click the [Default Section] item. This is currently set to a North-South direction.
-
In the Section Properties dialog, define the Section Orientation as [Horizontal] and set the Mid-Point XYZ coordinate (6110, 5100, -40) parameters.
-
Click OK.
-
Using the View ribbon, select the View | Align command.
-
In the 3D, use the View | Zoom Area command to drag a rectangle around the displayed block model cells:
Creating a New Strings Object
-
In the Current Objects toolbar, select the Object Type [Strings], click Create New Object using the default template. If you can't see the toolbar, check that it is displayed using the Home ribbon's Show menu.
-
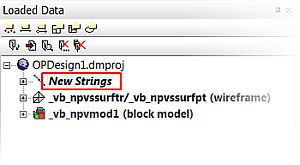
In the Loaded Data control bar, check that the New Strings object is listed that it is the current strings object i.e. highlighted bold:
Drawing the Pit Base String by Snapping to Grids
-
Using the Home ribbon, select Snap | Grid.
-
In the Current Objects toolbar, select the Attribute [COLOUR], select the Attribute Value [12 (White)].
-
Type 'ns' to start digitizing a new string
-
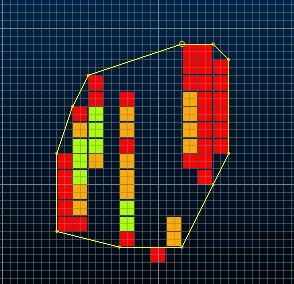
In the 3D window, using the coordinates displayed in the Status Panel and the resultant image shown further below (step 11), draw a clockwise string by right-clicking at the following points in sequence, like this:
-
Click Done to complete digitizing.
-
With the string still highlighted in yellow (meaning it is selected), use the quick key 'clo' to close the string.
-
Use the Home ribbon to select Snap | Points.
")
It is important that the snap mode is changed back to points. Not doing so will effect later exercises.
-
In the 3D window, right-click and select Deselect All Strings.
Saving the New Strings Object to a Datamine File
-
In the Sheets control bar, expand the Strings folder, right-click on the [New Strings] overlay and select Data | Save As.
- In the Save New 3D Object dialog, click Extended Precision Datamine (.dm) File.
- In the Save New Strings dialog, select the path to you tutorial folder, define the File name: as 'pitbase-40', click Save.
- In the Sheets control bar, check that the [New Strings] object has been replaced by the object pitbase-40 (strings).
- Save your project and click OK.
You can check your perimeter against the example file _vb_pitbase-40.dm. This example file contains a perimeter with the same number of points, in approximately the same positions, but which were digitized without snapping to a 10x10m grid. As a result of this, the points have slightly different coordinate values. |
Copyright © Datamine Corporate Limited.
JMN 20048_00_EN