|
|
Adding and Setting a BENCH Attribute Adding and Setting a BENCH attribute interactively in the design window |

Overview
In this part of the tutorial you are going to add a new attribute column and set its value for a set of open pit design strings.
Prerequisites
Required:
-
Created a new project and added all the required tutorial files i.e. the exercises on the Creating a New Project page.
-
Loaded and viewed the ultimate pit shell model data i.e. the exercises on the Viewing Ultimate Pit Shell Models page.
-
Created and applied a custom legend, filtered cells, for the NPVS block model i.e. the exercises on the Creating a Custom Display Legend page.
Recommended:
-
Specified project and mine design settings i.e. the exercises on the Specifying Design Settings page.
Files required for the exercises on this page:
-
_vb_trc_pit0
Link to Exercises
The following exercises are available on this page:
Exercise: Adding and Setting a BENCH Attribute Interactively
In this exercise you are going to add a user defined BENCH column to the bench strings _vb_trc_pit0 and then set the attribute on the strings interactively in the Design window. This includes the following tasks:
-
Defining data and design plane settings
-
Saving to a new strings file
-
Adding a new BENCH attribute
-
Setting the BENCH attribute
-
Saving the data.
Defining Data and Design Plane Settings
-
Select the Design window.
-
In the Project Files control bar, Strings folder, drag-and-drop the following file into the Design window:
-
_vb_trc_pit0
-
-
In the Sheets control bar, Design Overlays folder, select only the following overlays (i.e. display these overlays):
-
Default Grid
-
_vb_trc_pit0 (strings)
-
-
In the View Control toolbar, click Zoom All Data.
-
In the View Control toolbar, click View Settings.
-
In the View Settings dialog, define the parameters shown below, click OK:
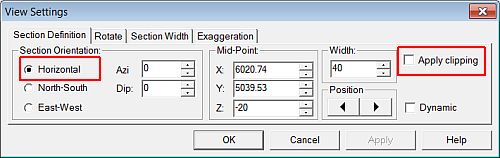
-
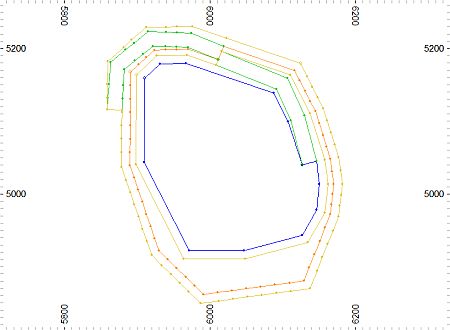
In the Design window, check that the two lowest benches of the toe-ramp-crest pit design are displayed, as shown below:
Saving To a New Strings File
-
In the Loaded Data control bar, right-click on the _vb_trc_pit0 (strings) object, select Data | Save As.
-
In the Save New 3D Object dialog, click OK.
-
In the Save New Strings dialog, select the path to your tutorial folder 'C:/Database/MyTutorials/OPDesign', define the File name: as 'trc_pit0BENCH.dm', click Save.
-
In the Loaded Data control bar, check that _vb_trc_pit0 (strings) has been replaced by trc_pit0BENCH (strings).
-
Check that trc_pit0BENCH (strings) is the current strings object i.e. highlighted bold.
Adding the BENCH Column
- In the Loaded Data control bar, right-click trc_pit0BENCH (strings), select Add Column.
- In the Add Column dialog, define the column Name as 'BENCH', Type [Numeric], Default Value [absent(-)], click OK.
Setting the BENCH Attribute
-
In the Design window, select the blue toe, green ramp and yellow crest string for the lowest bench i.e. bench -20 (toe elevation -40m, crest elevation -20m).
")
The three strings can be selected either by dragging a selection rectangle or by individually selecting the strings using <Ctrl>+Click.
-
Select Design | Edit Attributes | Edit (eat).
-
In the Edit Attributes dialog, define a BENCH attribute value of '-20', click OK.
-
In the Studio 3 confirmation dialog, click Yes.
-
Repeat steps 1 to 4 for the next three toe, ramp and crest strings, setting a BENCH value of '0'.
-
In the Design window, select individual strings and check the BENCH values displayed in the Data Propertiescontrol bar.
Saving the Data
-
Select File | Save.
-
In the Save Data/Set Auto Reload dialog, select to Save the trc_pit0BENCH (strings) object, click OK.
|
|
If you are not happy with the design at any stage, you can erase the incorrect strings and recreate them using the open pit design commands. The design MUST be restarted from either a toe or crest string, NOT from a road segment. |
Copyright © CAE Inc.
MIN 20048_00_EN