|
|
Stockpiling and the Immediate Reclaim Feature Using the immediate reclaim feature when scheduling stockpiles |
Stockpiling and the Immediate Reclaim Feature
Introduction
Immediate Reclaim enables you to reclaim from a stockpile in the same period as the stockpile is built, rather than waiting for the next period before being able to reclaim it as was previously the case. Two types of stockpile reclaim are possible:
-
Reclaiming From a Fixed Stockpile - adding material to a stockpile and reclaiming it once loading has finished.
-
Reclaiming From a 'Fluid' Stockpile - adding material to a stockpile and reclaiming it before loading has finished.
|
|
|
|
|
The following procedures assume that a scheduling project has already been set up and that activities, destinations (including stockpiles), targets, etc. have already been set up. |
Reclaiming From a Fixed Stockpile
The following steps outline the general procedure for adding material to the stockpile and reclaiming it once loading has finished:
-
In the Stockpiles control bar, check the current tonnage and grade status of the required stockpile, e.g.:

-
Turn on Perimeter Selection Mode.
-
In the Design window, zoom in to the area of interest.
-
Select the required mining blocks.

These blocks would need to contain material that is destined for the above stockpile.
-
Click Schedule Selected Blocks
 .
. -
In the Schedule Activities dialog, find the required [Loading (manual)] Activity, click the corresponding Schedule... button in the Action column.
-
In the Schedule Selected Blocks dialog, select the required Period, tick the Selective Mining checkbox.
-
Click OK.
-
In the Schedule Activities dialog, click Done.
-
In the Stockpiles control bar, check the status of the relevant stockpile to make sure that the scheduled material has been added to the stockpile and appears in the Supply column i.e. that another record has been added to the grid, e.g.:

-
Run the Activity Schedule command.
-
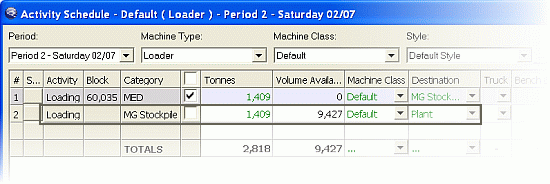
In the activity schedule grid, check that this last scheduled activity (loading to stockpile) is listed, e.g.:

-
In the Schedule group, click Stockpiles....
-
In the Schedule from Stockpiles dialog, Stockpile Movement tab, define the required material mass to be mined, in the Tonnes column, for the relevant Stockpile, click OK, e.g.:

-
In the Activity Schedule dialog, check that this latest activity (reclaim/mining from stockpile) is listed:

-
Close the Activity Schedule dialog.
-
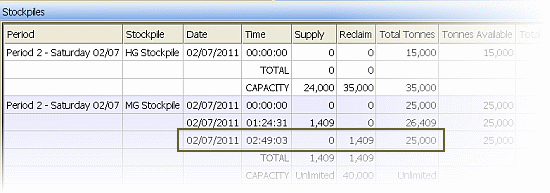
In the Stockpiles control bar, check the status of the relevant stockpile to make sure that the scheduled material has reclaimed from the stockpile i.e. that another record has been added to the grid, e.g.:

|
|
Instead of running Activity Schedule, the reclaim can also be achieved by selecting Schedule from Stockpiles and reclaiming the amount just mined. |
Reclaiming From a 'Fliud' Stockpile
The following steps outline adding material to the stockpile and reclaiming it before loading has finished:
-
In the Stockpiles control bar, check the current tonnage and grade status of the required stockpile, e.g.:

-
Turn on Perimeter Selection Mode.
-
In the Design window, zoom in to the area of interest.
-
Select the required mining blocks.

These blocks would need to contain material that is destined for the above stockpile.
-
Click Schedule Selected Blocks
 .
. -
In the Schedule Activities dialog, find the required [Loading (manual)] Activity, click the corresponding Schedule... button in the Action column.
-
In the Schedule Selected Blocks dialog, select the required Period, tick the Selective Mining checkbox.
-
Click OK.
-
In the Schedule Activities dialog, click Done.
-
In the Stockpiles control bar, check the status of the relevant stockpile to make sure that the scheduled material has been added to the stockpile and appears in the Supply column i.e. that another record has been added to the grid, e.g.:

-
At this point the procedure for fluid reclaim differs from the that for fixed reclaim.

In order for any reclaim task to start before the loading of the stockpile task completes, two things need to be done:
-
a second machine (loader) needs to be added
-
a delay activity is needed on the second machine (loader) so that it only starts reclaiming after the stockpile building task starts.
-
-
Run the Activity Schedule command.
-
In the Activity Schedule dialog, Machine Class dropdown, select a different machine e.g. [LDR1] i.e. and not [Default].
-
In the Schedule group, click Delay.
-
In the Insert Delay dialog, add a delay with a duration long enough to allow enough loaded material to have been added to the required stockpile e.g. 1hr (the duration for loading the original mining block is 1:24:31), and click OK:

This delay will ensure that enough loaded material (i.e. loaded from the previously selected mining block) is available for reclaim on the stockpile.
-
With the second loader selected above e.g. [LDR1], in the Schedule group, click Stockpiles....
-
In the Schedule from Stockpiles dialog, Stockpile Movement tab, change the Loader from [Default] to the second loader e.g. [LDR1],
-
Define the required material mass to be mined, in the Tonnes column, for the relevant Stockpile, click OK, e.g.:


-
The Reclaim Time changes to a later time which includes the delay duration; this then shows the time at which the second loader e.g. LDR1, can start ‘working’.
-
The Available Tonnes for the stockpile e.g. MG Stockpile is reduced, as the full material mass will not be available for normal reclaiming until all the original material has been loaded to stockpile.
-
-
In the activity schedule grid, check the Start Time and Finish Time for this activity:


In addition to the above, the Delay activity could be synchronized with the start of the Default loader activity, using the Synchronisation dialog.
-
Close the Activity Schedule dialog.
-
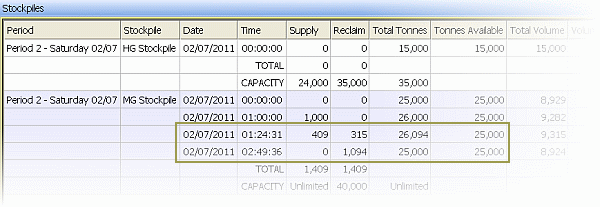
In the Stockpiles control bar, check the status of the relevant stockpile to make sure that the scheduled material has been reclaimed from the stockpile only after the specified delay:


The time displayed under the Time column corresponds to the Finish Time for an activity.
|
|
Related Topics |
|
|
Define
Process Flows Destinations Targets |


