
Insert Template Task
To display this screen:
-
Drag a Template Task from the Generate Tasks side bar into the main Tasks area, at the location the new task should appear.
Use this screen to insert a Template Task item into the schedule and lets you choose how the new task is inserted in relation to the selected task in the schedule.
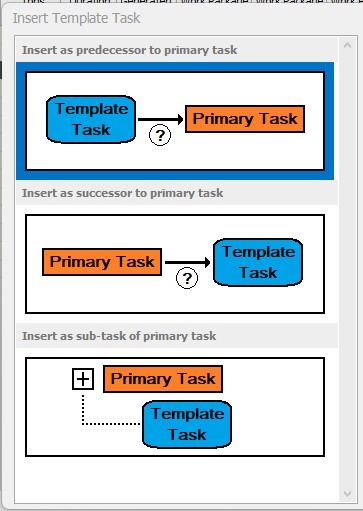
When you insert a Template Task item, you can update an existing work package by insert the new item as either a predecessor to the primary task, a successor to the primary task or a sub-task of the primary task.
Note: You can also Insert a Work Package
Activity steps:
-
Ensure your project has at least one defined Template Task Repository.
-
Display the Generate Tasks Sidebar.
-
Display the Tasks area and drag a Template Task item into the schedule at the location you want it to be actioned.
The Insert Template Task screen appears.
-
On the left of the screen, up to three buttons display (depending on whether the drop target task is a parent item or a member of a work package:
-
Template Task >> Primary Task – This option inserts the new task before the primary task and makes the new task a predecessor. With this option, you can define dependency settings for the injected task.
Note: If the drop target was a parent task, this option is not available.
-
Primary Task >> Template Task – Insert the new task after the primary task and makes the new task a successor. As above, you can define dependency settings for the injected task.
Note: If the drop target was a parent task, this option is not available.
-
Primary Task + Template Task – Insert the new task under the primary task as a sub-task. In this scenario, dependency settings (type, lag and so on) are derived from the parent task and cannot be set independently.
-
-
If you chose the Template Task >> Primary Task or Primary Task >> Template Task option, you can edit the Dependency Details before you insert the task. These settings control the dependency that is created for the inserted task:
-
Review and set the dependency Type. See Dependencies.
-
Review and set the dependency Lag. This is the delay between predecessor and successor activities starting.
-
Choose the Calendar to which the task is associated. This can be either matching the Predecessor Task, Successor Task, <Project> or <Standard>.
-
Review and assign the dependency Layer onto which the new task will reside. See Dependency Layers.
-
-
If you chose the Template Task >> Primary Task or Primary Task >> Template Task option, you can decide how dependencies are inherited by the injected task.
-
Template Task >> Primary Task scenario – You can inherit dependencies from the primary task's predecessors. All predecessor tasks are listed (a task can have multiple predecessors). Use the initial check box to inherit the dependencies from the selected task.
-
Primary Task >> Template Task scenario – As above, but this time you are picking the successor activity(ies) from which to derive dependencies.
Note: Select All and Select None buttons appear above the table.
-
-
To flag up the inserted task in the Task table (Information column), check Bookmark Task(s). Bookmarked tasks appear like this:

-
Check Open Task Information to open the The Task Information Screen immediately after inserting the task.
Related topics and activities: