
Standard Targets
To access this screen:
-
In the Scheduling Setup wizard, select Constraints >> Targets >> Standard
Add, edit and delete grade/quality scheduling targets relevant to a specific destination. One example of this would be to limit the flow of material to a plant destination to avoid exceeding the maximum known capacity for a time period.
This screen is used to both define the target variables and bounds, filter expression and period target bounds and associate the resulting constraint with a predefined destination.
Targets are applied to the total material sent to a destination in a period and are the primary controls for the blending algorithm; they are defined using this and subsequent dialogs. A good example of a target might be the target head grade to the Plant.
Standard targets are formed using the grid. Once a target has been added, you can define its parameters, including whether to activate it or not. The constraint will have an associated Expression, based on entries in the table below.
A Minimum and Maximum target can be set for each time period defined for your schedule.
One or more targets can be set for the same destination, and targets
can be set for any destination in your project.
Standard & Advanced Targets
Similar to standard grade/quality targets for destinations, advanced targets can create targets across multiple destinations including ratios, for example, total pit excavation vs. reclaim amounts. Within advanced targets grade values are considered as metal tonnages so to achieve the same target as a standard destination grade target within global it must be a ratio where the grade is divided by the weighted field. For example:
- Standard Target AU,
- Advanced Target AU/Tonnes
...will both give the same result.
Targets are output to the Targets control bar for both global and destinations where the values in the schedule are calculated for the period(s).
Targets and Target Expressions
All block attributes are defined as mass. To consider element grade for a destination target, you can set a product target variable only and set the denominator to express the total ore mass. To consider element percentage grade, set the element coefficient in the numerator to 100.
Each Target is given a name and is defined by the target variables that apply to it. These variables come from the fields included in the Block Reserves (Results) file. The Target is expressed as a rate or ratio per period as follows:
-
Rate: V = Ax + By + Cz + ...
Rate target types are constructed using a target variable Numerator value (without setting a Denominator, leaving it at 0). -
Ratio:V = (Ax + By + Cz + ...)/(Dx + Ey + Fz + ...)
Ratio target types are constructed using a target variable Numerator value and a Denominator value greater than 1.
...where A, B, C, D, E, F are user-defined coefficients and x, y, z denote block attributes (fields, data columns) like grade/quality values, tonnage's, and elements mass.
Target Bounds
For each target variable you must define lower and upper bounds (minimum and maximum). The scheduler will search for schedules that keep all target variables within the specified bounds.
You can vary the bounds over time. For example, to set the two values to 2 and 6 for the first 2 time units, to 0 and 4 for the next 10 time units, and to 0 and 5 thereafter. These values are entered in separate records in the Target bounds by grid as follows:
|
Row |
End Period (Time) |
Minimum |
Maximum |
|
1 |
2 |
2 |
6 |
|
2 |
10 |
0 |
4 |
|
3 |
200 |
0 |
5 |
Note: For the final time period, you can define End Period as any number greater than the lifetime of the mine.
Multiple Targets
The following notes apply when defining multiple targets:
- Specify which material type can go to which destination, and the source from which the material is taken (e.g. reclaiming from a particular stockpile). Some material categories can potentially go to more than one of the defined destinations, for example ore may go to a plant or a leach pad.
- Specify, for each destination, the required material amounts and qualities for the period. Target amounts are given as three values: minimum, maximum and specific target.
- Use ratios or rates to define targets.
- Blending to achieve multiple product types from several mining blocks is handled by specifying each product type as a destination.
- If an objective function is defined this can be a choice of maximizing or minimizing any block value, such as tonnes, grade or value, to a specific destination.
- A revenue field may have been imported, or may be virtually constructed using other imported fields. This revenue field will be one of the optional fields on which to optimize.
- A choice of linear programming (LP) or quadratic programming (QP) is available for blending. QP always gives the nearest possible solution even when an exact solution is not possible.
Note: Targets can also be edited or deleted by selecting the target from the list and selecting the relevant button.
Also, see .
Manage Targets
To add a new scheduling target:
-
Display the Standard Targets screen.
-
Below the Grade/Quality Targets table, click Add.
A new target appears at the bottom of the targets list.
-
Click into the Target cell and enter a target name. Press ENTER.
-
Click into the Source cell and select the Material Movements Source popup to define one or more source locations from which material will be derived.
Note: The default is [All] meaning all material sources are considered
-
If a Filter has been defined already, select it.
-
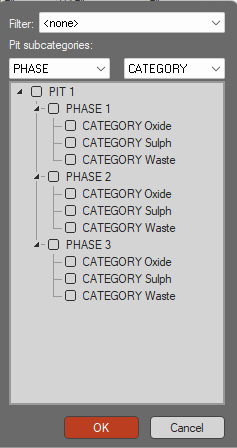
Pick the Pit subcategories that reflect the important material sources. For example, if you wanted to ensure targets are set by PHASE and CATEGORY, select these attributes from the respective lists.
The available movement sources appear below, for example:
-
Click OK to return to the Targets screen.
-
-
Click into the Destinations cell and choose the destination for which the material category is intended (Mill, Leachpad, and so on). See Configuring Destinations.
-
Click into the Destinations cell and pick one more destinations that relate to the target.
-
Click into the Categories cell and pick one or more material categories that are relevant for the target.
Warning: Whilst the Categories list is filtered based on previously-selected Destinations, the reverse isn't applied. As such, if Categories are defined, be careful when subsequently editing Destinations as this could lead to an invalid constraint (for example, where material movement is restricted to low grade material from a high grade destination).
-
For more detailed refinement, further constrain the target by defining a filter Expression . This is the expression defining the target, either a rate or ratio, based on the Target Variables settings below.
-
Define the Maximum and Minimum value range for the target, for each time Period.
To define target variables:
You can define a target variable (essentially, a scheduling attribute) as a proportion or multiple of other target attributes. For example if you wanted to set a target representing a combined AU/CU threshold, you could set the Numerator for AU to 1, and the Denominator for CU to 1 as well.
-
Define each target variables Numerator (and for ratio targets, a Denominator) to update the Expression (see above) used for the constraint.
-
Define the target's Target Bounds by Period settings. Updating the Minimum and Maximum value updates the target's period settings in the table above.
Note: Target bounds can be set for each time period in your schedule.
-
Click Apply to save the new target.
To manage existing targets:
-
Select a target in the Grade/Quality Targets table, and decide what to do with it:
-
Click Copy to create a clone of the selected target. This can be useful to test sensitivity to target variables, bounds, filters and so on.
-
Click Move Up or Move Down to reposition the target in the list.
-
Click Delete to remove a target.
-
Related topics and activities