
Getting Started
Studio Mapper builds on the strengths of Datamine's core Studio engine whilst delivering a versatile, feature-rich application for all field geologists.
Note: Studio Mapper is a long-field-name product, meaning attribute names up to 24 characters are supported. See Attribute Naming Convention.
With a comprehensive array of data management, editing and visualization tools combined with smart proprietary field data mapping functions, Studio Mapper is the definitive digital field book, designed to meet the surveying requirements of even the most demanding projects.
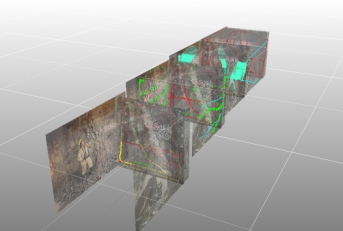
A set of three georeferenced maps in Studio Mapper
Studio Mapper provides the non-assayed samples (including standard and duplicate samples) and their locations, which are uploaded to a Geological Database Management System such as Datamine Fusion, for example. Assayed samples are output from the GDMS for use in Studio RM or Studio RM Pro (or other programs used for grade estimation). Channel samples output from GDMS systems as desurveyed holes (or subsequently constructed) can be used for downstream estimation and modelling.
Important: Your product automatically installs Datamine License Services. Don't downgrade this installed version or your product won't run.
About This Guide
Your Help file contains a wide range of information to help you get the most out of your application. This topic describes key application concepts, and is a good place to start if you are new to Studio Mapper. Read through them all, or pick a topic to jump to a specific section:
- Studio Mapper Configuration Files
- Project and Database Setup
- Map Creation and Adding Map Items
- Georeferencing Maps
- Visualizing 3D Data
- Exporting Field Data
- The Datamine Studio Product Range
Studio Mapper Configuration Files
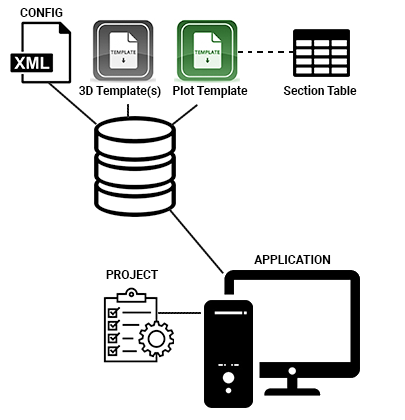
Your application makes use of a series of customizable configuration files to ensure it fits in with your field mapping operations.
These files should be prepared before you start creating a georeferencing your field data. They will often be set up as part of an implementation phase by Datamine staff, but experienced users are also able to do this:
- System Configuration File:
Map types (and their associated reporting templates), map properties,
features (and their associated display templates), attributes
and naming conventions can all be customized using the system
configuration files.
For example, you can set up a map type for a single, front face, or a full front/left/right/roof heading, with each supported by a dedicated plot reporting template. Each map type can select from one or more predefined geological features/structures described by custom attributes and values (e.g. "Lithology", "StrataID" etc.).
The System Configuration File contains eXtensible Markup Language (XML) data, and is linked to a project using the Settings screen.
See System XML Configuration File. - Report Templates: Each
Map Type that is selected using the Mapping
dialog can be associated with a plot template (.dmtpl). A plot
template can include a range of plot items (tables, titles, north
arrow etc.) including standard bitmaps for corporate branding.
A mapping plot template is set up using indexed projections that correspond to a given section definition, and is described here.
See Report Template Configuration and Studio Plot Templates. - 3D Data Display Templates:
map structures, such as Features,
can be automatically formatted when digitized to use an existing
data display template. This information is held within a .3dtpl
file, within your database's Templates
folder and is linked to a particular map object type using the
System Configuration File. See Data display
templates.
- Profile Templates: also an XML file stored in the Studio Mapper database's Templates folder, but this time generated by the Profile Manager. Each file contains one or more profile definitions that can be applied to any map face. See Drive Profile Manager.
Project and Database Setup
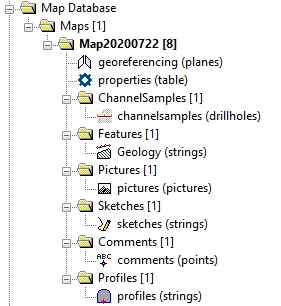
Project Data control bar showing a simple Studio Mapper database
To use Studio Mapper, each project must be linked to a Studio Mapper database. This database contains data related to your mapping operations, and is displayed in an expanding 'tree' using the Project Data control bar.
- New database: you can
use Studio Mapper to create a new database, or point to an existing
one. See Managing your database.
- Assign a configuration file: Once a System Configuration File has been created, it is linked to the current Studio Mapper project using the Settings panel. See System Configuration File.
- Mines and areas: you also need to define a spatial context in which your mapping data is managed/created. This is done by specifying a Mine and Area. See Configuring mines and areas.
- Central Database Setup: if you plan to share your mapping data with others, Studio Mapper offers a simple and effective server/client data management system that lets you prepare offline/local mapping data and commit it to a central folder database when you get back to the office. See CENTRAL database setup.
- Project Data control bar: the Project Data control bar displays all data associated with your project including data within the current database. See Project Data control bar.
Map Creation and Adding Map Items
- New map: a map is comprised of one or more faces. This configuration of map faces is represented by the Map Type. The Map Type can either be set up manually, or can be picked from an option as defined in your System Configuration File. A map is then configured using map-level properties, using custom values defined in the same file. See Creating a mapand Setting map properties.
- Current map:
a map is made 'current' before it is modified. There are several
ways to do this.. See Setting the current map.
- Map Items: once a map exists, you can add items to it, including:
-
Digitizing and editing: digitizing 3D structures on a map is possible using a range of editing tools and digitizing modes. See Tips for editing maps.
Note: When a map is created, it is added to an internal database of map names and creation dates/times.
Note: Data files associated with a map will also include alphanumeric data columns describing the MINE, AREA and MAPNAME associated with the map to which the data belongs. This applies to all data files.
Georeferencing Maps
- Map and world windows: georeferenced or local coordinate maps can be displayed using a dedicated map window. Georeferenced maps can also be displayed in their world context using the 3D global window. See Map and World windows.
- Georeferencing methods: Studio Mapper assigns world coordinates to map data using one of the available georeferencing functions:
- Repositioning a map: you can fine-tune the position of a georeferenced or local map using the map Rotate function. See Rotate function, Setting the rotation origin and Resetting georeferenced maps to local coordinates.
Visualizing 3D Data
Studio Mapper's data is displayed using different data view windows, which can be controlled using a variety of viewing tools. As well as 3D views (see above), you can also represent your data in a 2D format for reporting.
- Gesture and stylus controls:
your application is designed for use on a touch device. See Touch and mouse modeand Using a
touch device.
- 3D Navigation Toolbar: a touch-device-friendly toolbar can be used to adjust the view of your data in any 3D view. See Navigation toolbar.
- Navigation Controls: 3D windows can also be controlled using a set of additional controls for automatic zooming, panning etc. See Navigation controls.
- Plots: your 3D
window views and reporting data are closely linked. You can set
up your report-ready plots using the Plots
window, although in the most part, reporting in Studio Mapper
is automatic. See Report Templates.
- Sections, views, objects, overlays: Studio Mapper uses a visual hierarchy for managing and displaying visual data. See Visual hierarchy.
Exporting Field Data
Studio Mapper's database (local or remote) can be used to store the data created by the digital mapping process, either at the face or in the office.
This valuable data is commonly consumed by other applications and systems. The transfer of field mapping data to other systems can be performed using any of the following mechanisms:
- Datamine binary data representing features, channel sample data, profile, sketches, comments and other tabular information such as map properties can be exported in a format understood by Datamine Studio applications, typically Studio RM. Feature strings, for example, are a useful input to implicit modelling functions, such as when refining vein models for downstream estimation, for example. This data could be useful in other Studio applications too, say, to guide the generation of design strings in underground planning. See Exporting data to a folder structure.
- Export of channel sample information to a Datamine Fusion database. This process will commit channel sample data to a connected Fusion database. Samples will be validated to avoid duplication and fields will be mapped to those expected in Fusion using a Fusion mapping utility. See Exporting to a Fusion database.
Exporting data to a Fusion database requires the following:
- Access to a Fusion database with administrator-level privileges.
- A Studio Mapper project containing at least one channel sample.
- A reference to a pre-configured field mapping template in the Studio Mapper system configuration file (this will be provided by Datamine during system implementation).

The Datamine Studio Product Range
Studio Mapper is
part of Datamine's Studio product range, which includes:
Studio EM for exploration data connection, management and reporting.
Studio NPVS, RMS and Maxipit for strategic open pit planning and scheduling.
Studio Geo for rapid geological modelling (coming soon).
Studio NPVS, RMS and Maxipit for strategic open pit planning and scheduling.
Studio PM for short-term operational scheduling (coming soon).
Studio OP for short- to mid-term scheduling and automated pit design.
Studio RM for resource modelling and grade estimation.
Studio SURVEY for open pit and underground mine survey data collation and management.
Studio UG for underground development design and scheduling.
Related Topics and Activities