
Data Explorer
Click the Data tab from the Isatis.neo Main Interface to access to the Data explorer. The Data explorer allows the management of the Isatis.neo data using the usual commands - create, ask for information, edit, copy, rename, compress, delete...
The Data explorer allows you to visualize the content of your project. A project is organized with folders, files and variables (files, respectively variables, being contained in a directory, respectively in a file).
By default, the folders and the files are sorted following the alphabetical order. The variables contained in a file are distinguished: structural variables appear first, then other variables are sorted in alphabetical order.
Note: Structural variables are variables which are always associated to a specific type of data table. This includes coordinates and sample numbers, as well as, for example, the object (line) number and relative number on a boreholes data table. The contents of these variables cannot be modified (except by specialized operators).
The folders, files and variables can also be ordered by:
-
 Type:
Type:- For files: points, drillholes, polylines, grids (regular and sparse), polygons, wireframes and sub-blocks.
- For variables: structural variables, selection (and macro selection) variables, categorical (and macro categorical) variables and other variables (numerical and text).
- Name: files and variables are sorted following the alphabetical order (default mode)
-
Last modified: The last modified directories and variables are at the top of the data tree.
- For files, the last modification date is the last modification date of the most recent variable contained in the file.
- For variables, the modification date will be updated each time their values are modified. A modification of a property of a variable will not change the last modification date of this variable.
- Creation date: The most recent files and variables are at the top of the data tree.
For each criterion, you can switch between ![]() ascending and
ascending and ![]() descending order.
descending order.
Click ![]() Collapse all /
Collapse all / ![]() Expand all to respectively hide / show the content of all data (folders and files) in one click.
Expand all to respectively hide / show the content of all data (folders and files) in one click.
A pictogram is associated with each variable according to either their structural role, type, storage type or unit class. This pictogram is gray for structural variables and green for other variables.
To clarify your data tree and make easier the find of a specific variable, you can filter variables depending on their type. Click to hide/show:
-
 /
/  Structural variables,
-
 /
/  Selection (and macro selection) variables,
-
 /
/  Categorical (and macro categorical) variables,
-
 /
/  Other variables (numerical and text).
You can also search (Ctrl+F shortcut) directly for the directory/file/variable name by clicking on the magnifying glass ![]() and entering a string of characters:
and entering a string of characters:
-
Activate the Case sensitivity
 option to treat as distinct uppercase and lowercase letters. By default they are equivalent.
-
Activate the Regular expression
 option to use regex for matching text.
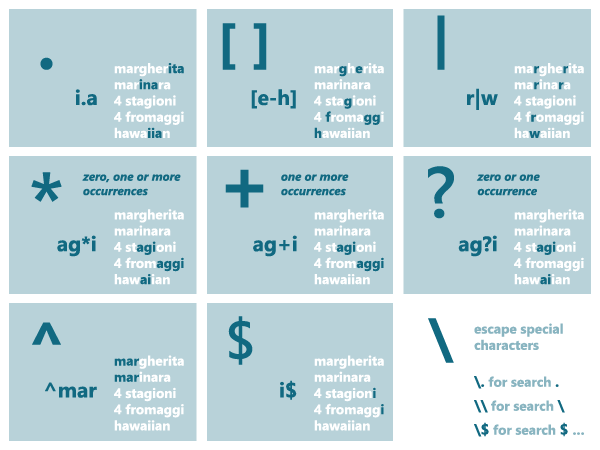
Pressing Enter, only the directories/files/variables corresponding to the search criterion will still appear in the Data tree.
Folder Operators
Remember that a folder contains only data files and no parameter files. The following actions are available:
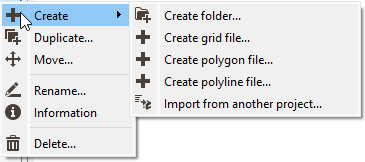
- Click Create /
 Create folder to create a new folder. This folder can be created directly at a first level or in an already existing folder. In this case, define the Parent Directory and a New Name. Otherwise simply enter a New Name.
 -
Click Create / Create grid file to pop up the Create Grid task. This panel is also reachable from the Data Management section of the ribbon.
-
Click Create / Create polygon file to pop up the Create Polygon task. This panel is also reachable from the Data Management section of the ribbon.
-
Click Create / Create polyline file to pop up the Create Polyline task. This panel is also reachable from the Data Management section of the ribbon.
-
Click
 Duplicate to save a copy of the selected directory and all its content. Define a New Name for this directory.
 -
Click
 Move to relocate the selected folder. Define the new Destination Directory. You can rename the folder at the same time.
Note: This action can also be performed interactively by dragging and dropping the content of a folder into another one from the data explorer. Several folders/files can be selected and moved at the same time but they have to be at the same level.
-
Click
 Rename and enter the new name for the selected folder.
-
Click
 Information to display information (name, comment, application and size) in the Messages window.
-
Click
 Compress to compress the contents of the selected folder. It enables you to save disk space.
 In Isatis.neo, all variables are stored/allocated at creation time with their full number of samples available. An empty variable or a variable that has been only partially defined takes a lot of space and can easily be compressed with a large number of identical (at least the undefined) values being stored.
Isatis.neo allows the compression of a complete folder, file or individual variable. Compressing a folder or a file compresses all variables inside. The compress action is available from any item in the Data tree. The compressed variables appear with a different decoration
 and the item size before/after compression is indicated at the end of compression.
All these folders, files and variables are still available after compression. An item can be uncompressed if you ask for it by clicking on
 Uncompress or if it needs to be rewritten (i.e. modification of the folder/file/variable content). This uncompress operation is performed automatically and is transparent. A reading action, the calculation of statistics for example, does not require the item to be uncompressed.
 - Click
 Delete to definitely remove the selected directory.
File Operators
The following actions are available:
-
Click Duplicate to save a copy of the selected file and all its content. Define a New Name for this file.
-
Click Move to relocate the selected file. Define the new Data destination. You can rename the file at the same time.
-
Click Rename and enter the new name for the selected file.
-
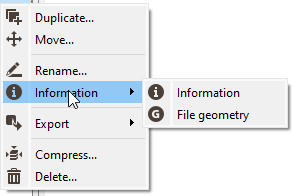
Click Information / Information to display information (name, comment, application, type, geometry, dimension and size) in the Messages window.
-
Click Information /
 File geometry to display the geometry of the selected file (file type: points/boreholes/grid/polygon/polylines, dimension: 2D/3D, bounds extension) in the Messages window.
-
Click
 Export and choose in which format you want to export the selected file. The list of formats depends on the file type. The different exports are also available from the Home section in the ribbon.
-
Click Compress to compress the contents of the selected file. The contents of all the variables of all the data tables belonging to this file are compressed.
-
Click Delete to definitely remove the selected file.
Data Table Operators
If the selected file is a points file or a grid file, the following additional actions are also available:
-
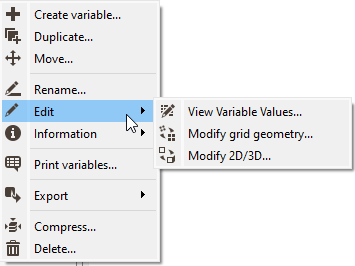
Click Create variable to pop up the Create Variable task. This panel is also reachable from the Data Management section of the ribbon.
-
Click
 Edit /
  View variable values to pop up the Variable Editor task. This panel is also reachable from the Data Management section of the ribbon.
-
Click Edit /
 Modify grid geometry to pop up the Modify grid geometry task. This panel is also reachable from the Data Management section of the ribbon. This action is only available for grid data tables.
-
Click Edit /
 Modify 2D/3D to pop up the Modify file dimension task. This panel is also reachable from the Data Management section of the ribbon.
-
Click
 Print variables to pop up the Print Variables task. This panel is also reachable from the Data Management section of the ribbon.
Variable Operators
The following actions are available:

-
Click Create variable to pop up the Create Variable task. This panel is also reachable from the Data Management section of the ribbon.
-
Click Duplicate to save a copy of the selected variable. Define a New Name for this variable.
-
Click Rename and enter the new name for the selected variable.
-
Click Edit / Edit properties to pop up the Variable Properties. This panel enables you to set a description, to display the format, to specify a color scale and to access to an advanced description.
- Click Edit / View variable values to pop up the Variable Editor task. This panel is also reachable from the Data Management section of the ribbon.
- Click Edit /
 Change unit class to pop up the Change Unit Class task. This panel is also reachable from the Data Management section of the ribbon.
 - Click Information to display information (name, storage type, unit, path, size and last modification date)
- Click
 Variable statistics to display statistics on the selected variable in the Messages window. Statistics are displayed in the Message. This calculates the simple statistics (sample count, mean, variance, standard deviation, coefficient of variation, minimum and maximum). To access complete statistics, you can use the Statistics task.
 - Click
 Build histogram to pop up the Histogram task. This panel is also reachable from the Statistics section of the ribbon.
 - Click
 Build cross plot to pop up the Cross Plot task. The action is available if you select two numerical variables of the same data table. This panel is also reachable from the Statistics section of the ribbon.
 - Click Print variables to pop up the Print Variables task. This panel is also reachable from the Data Management section of the ribbon.
- Click
 Convert into categorical to pop up the Create Categorical Variable from Variable task. This panel is also reachable from the Data Management section of the ribbon.
 - Click
 Convert into macro selection to pop up the Create Macro-selection from Variable task. This panel is also reachable from the Data Management section of the ribbon.
 - Click
 Merge categories to pop up the Merge categories task. This action is only available if the selected variable is a categorical variable. The panel is also reachable from the Data Management section of the ribbon.
 - Click
 Transform using anamorphosis to pop up the Raw-Gaussian Transformation Using Anamorphosis task. This panel is also reachable from the Statistics section of the ribbon.
 - Click Export and choose in which format you want to export the selected variable. The list of formats depends on the data table type. The different exports are also available from the Home section in the ribbon.
- Click Compress to compress the selected variable.
- Click Delete to definitely remove the selected variable.